Detailed usage of A1111 WebUI SD1.5 / SDXL Control Net

ControlNet adds a variety of features. You will be able to use useful functions such as adding details to images and the img2img extension for generating images from rough drawings. In this article, we will explain in detail how to use ControlNet, which adds various functions to the WebUI. The explanation is based on ControlNet version v1.1.455 at the time of writing.
ControlNet Installation
ControlNet is installed from the “Extensions” tab. The following is a step-by-step explanation.
- Click on the “Extensions” tab to go to the page.
- Go to the URL input page from the “Install from URL” tab.
-
Paste the repository URL below.
https://github.com/Mikubill/sd-webui-controlnet - Click the “Install” button to install.
- After the installation is complete, go to the “Installed” tab and confirm that “sd-webui-controlnet” is in the list.
- Once confirmed, restart from “Apply and restart UI”.
- If ControlNet appears in the parameter area after rebooting, installation is complete.
The following article explains in detail how to do this.

Download ControlNet’s model
After installation is complete, download the models and place them in stable-diffusion-webui\extensions\sd-webui-controlnet\models. There are many different controlnet models besides the official models. Downloading all the models at once is quite large, so download only the models you want to try first. Download the desired pth or safetensors file together with the yaml file of the same name, if available.
Stable diffusion 1.5
Standard Control Net 1.1 modelThere are three standard models, LARGE / MEDIUM / SMALL respectively. Download according to your own VRAM.
- 🔗LARGE: These models are published by the author of ControlNet. Each model is 1.45 GB. Download the yaml file of the model you want to use in the same location.
- 🔗MEDIUM: This model is published by the author of ComfyUI. half the size of LARGE, with a model size of 723 MB. Download the file named “control_v11e_sd15_xxxx”.
- 🔗SMALL: Here is another model released by the author of ComfyUI. Each model is quite lightweight at 136 MB. Download the file named “control_lora_rank128_v11e_sd15_xxxx”.
🔗sd_control_collection: This model is introduced by the official. Basically, the model for SDXL is placed, but you can download the sd1.5 model of recolor/ip-adapter.
ControlNet++ControlNet++ is more accurate than the standard model.
- 🔗LARGE (fp32): There are canny/depth/hed/lineart/seg models. Download each model (1.45GB) and rename it from diffusion_pytorch_model. Example: controlnet++_canny_sd15_fp32
- 🔗MEDIUM (fp16): There is a canny/depth/hed/lineart/seg model.
Stable diffusion XL
If you want to use ControlNet with SDXL, download the model below.
- 🔗sd_control_collection: This model is introduced by the official.
- 🔗qinglong_controlnet-lllite: This model is published by qinglongshengzhe.
- 🔗TTPLanet_SDXL_Controlnet_Tile_Realistic: The model will be for Tile published by ttplanet.
- 🔗iroiro-lora: This is a test model for the control net published by 2vXpSwA7.
- 🔗MistoLine: You can download “mistoLine_fp16.safetensors”, a model published by TheMistoAI that is suitable for detecto-mapping of line systems such as Canny/Lineart/SoftEdge.
- 🔗kataragi’s HF page: You can download models for Inpaint/Recolor/Lineart/Line2color by kataragi.
- 🔗xinsir’s HF page: You can download models for Canny/Openpose/Scribble/Scribble-Anime by xinsir.
IP-Adapter anime
Basically, IP-Adapter’s inputs are suited for real images, and illustrations do not give good results. The following model will produce illustrations that are relatively close to the inputs.
- 🔗IP-Adapter anime fine tune: Model published by arnon. use with ip-adapter_clip_h with Contrl Type IP-Adapter.
- 🔗IP-Adapter-plus anime fine tune: Contrl Type is IP-Adapter and is used with ip-adapter_clip_h.
T2I-Adapter Models
The T2I-Adapter is designed to run lighter than standard control nets. Download the model below.
- 🔗T2I-Adapter/models: This is the SD 1.5 model published by the official TencentARC.
- 🔗ControlNet T2I-Adapter Models: The official TencentARC model is pth, so we present the safetensor version. Download both Controlnet and Config.
- 🔗T2I-Adapter/models_XL: SDXL models published by the official TencentARC. canny/open pose/sketch models are available.
What ControlNet can do for you
First, let’s look at the list of things you can do with ControlNet.
- Compositional Reference: The composition of the generated image is controlled with reference to the input image.
- Person Reference: Using the person in the input image as a reference, an illustration of the same person is generated in the new composition.
- Pose Reference: Controls the pose of the generated image with reference to the input image and Open pose.
- Inpainting: Inpaints the input image, specifying the mask range.
- Change color scheme: Change the color scheme of the input image.
- Refinement of the generated image: The input image is miniaturized to produce an image with more detail.
ControlNet Usage
Interface Descriptions
Default UI
- Unit tabs: Used when adapting multiple control nets. Normally used with Unit 0 only.
- Input tabs: Tab to switch between single, batch, and multi input images. Also, use the icon buttons at the bottom to create a canvas or use the webcam.
- Enable: Enable ControlNet check box
- Low VRAM: Select this check box if VRAM is less than 8 GB.
- Pixel Perfect: Automatically adjusts the resolution of the annotator.
- Allow Preview: Displays the Preprocessor preview. The preview is displayed with the 💥 button next to Preprocessor.
- Effective Region Mask: By turning it on, you can load a mask for the adaptive range of the control net.
- Control Type: Select a control type. Once selected, the appropriate Preprocessor and Model are automatically loaded.
- Preprocessor (Annotator): Creates a detect map with the specified annotator before adapting the control net. The 💥 button allows you to see a preview.
- Model: Select a ControlNet model. You can refresh the list with the 🔄 button.
- Control Weight: Adjusts the weight of the control net. The lower the value, the more priority is given to prompts.
- Starting Control Step: Specifies at which step the control net should start, between 0.0 and 1.0. Example: If Steps is 20, 0.5 will be applied starting at step 10.
- Ending Control Step: Specifies at which step to start the control net, between 0.0 and 1.0.
- Control Mode: Specifies the balance between control nets and prompts.
- Resize Mode: Specifies how to scale the input image and the generated illustration if they are different sizes.
- Batch Options: Specifies how the batch is adapted when using batch mode.
About input mode
Input mode can be changed from the Input tab.
Single Image
A single image is entered into the control net. After loading the image, specify the mask as a canvas. After the image is loaded, a Resolution item will appear under Control Weight.
Batch
You can specify a folder and enter the images in the folder into the control net; Batch count and Batch size remain 1 to generate all images in the specified folder.*When verified with v1.10.1 of the WebUI, the generated image is saved. But the preview was not displayed.
Multi-Inputs
Multiple input images can be entered and mixed. Select images by clicking on the “Upload Images” button. The weight of each input image cannot be specified.
About the Control Type
Control Type can be specified. Preprocessor and Model are automatically selected according to the specified type. The parameters that can be entered change depending on the type.
If you are using a preprocessor for the first time, it may take some time to download the necessary data. In particular, clipvision, which is used for IP-Adapter, Revision, etc., has a total of 7.38 GB of clip_h/clip_g/clip_vitl, so be careful if your storage space is limited. The downloaded files are stored in \stable-diffusion-webui\extensions\sd-webui-controlnet\annotator\downloads.
All:
Default type. All installed Preprocessors and Models can be selected and used in their own combinations.
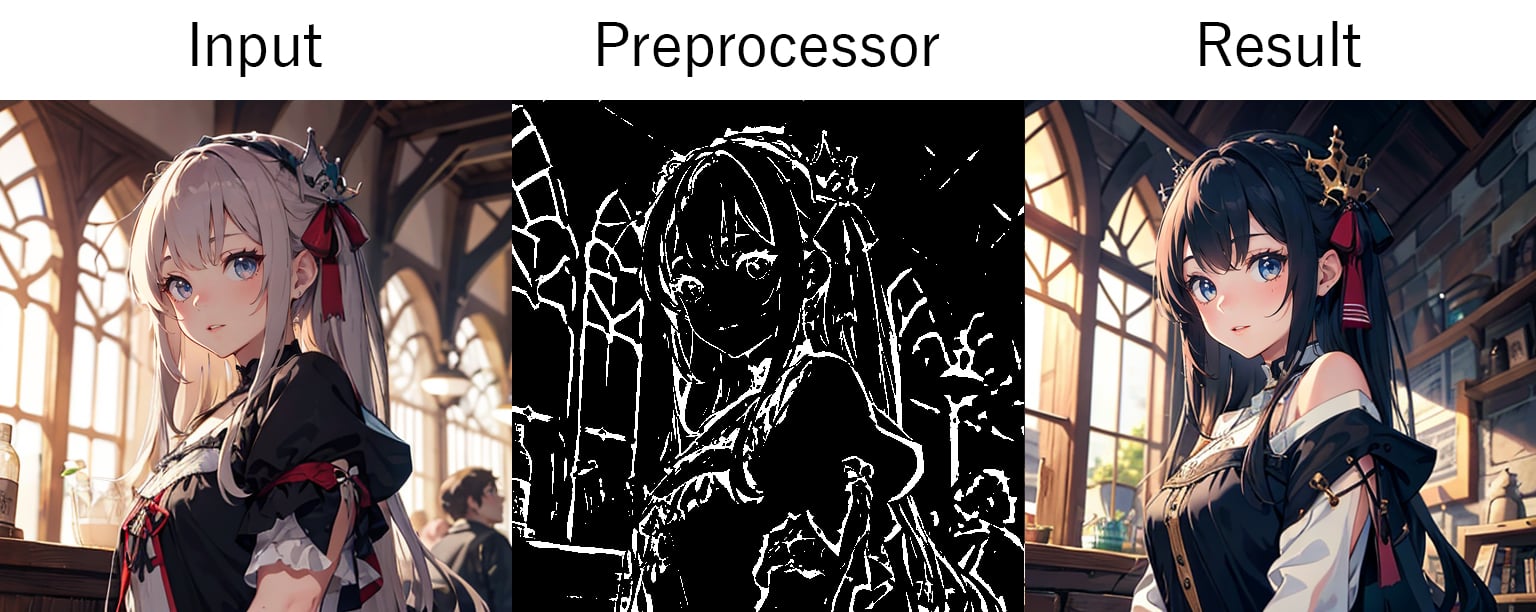
Canny:
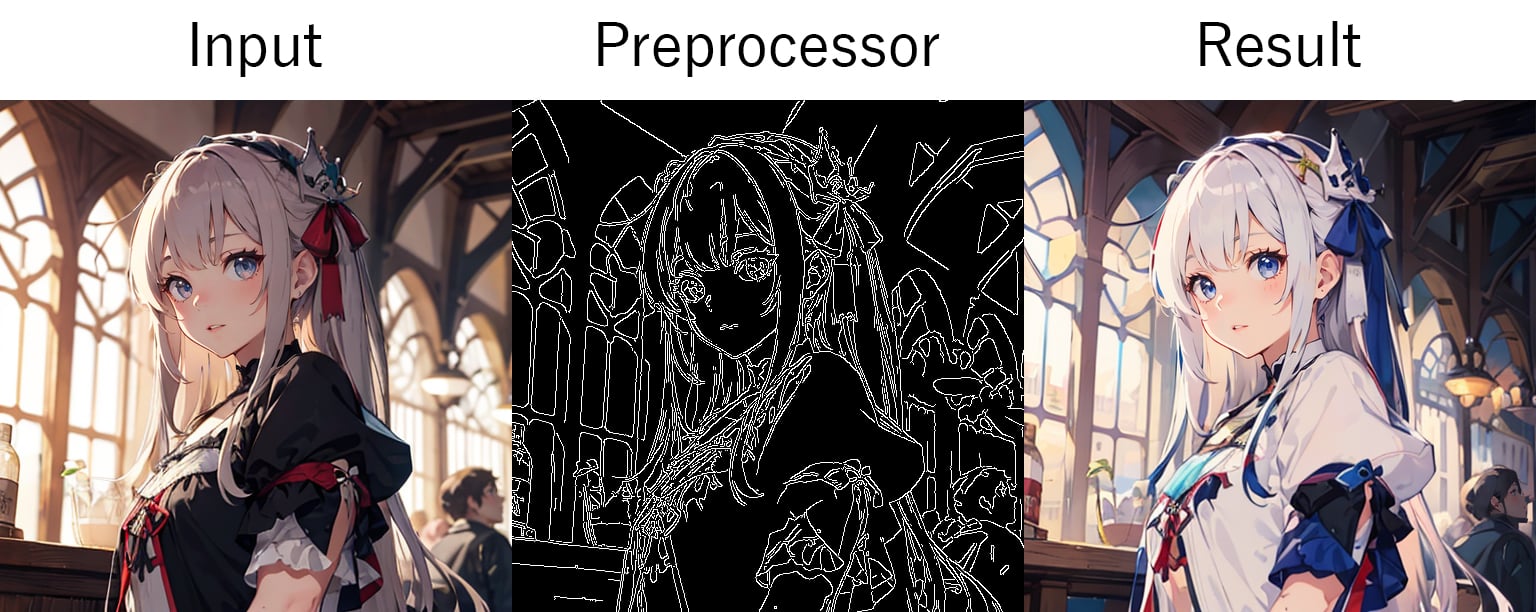
- canny: It will be an edge-ditection using Canny, a function of the Python library OpenCV.
- invert (from white bg & black line): Use this for input images with black lines on a white background, such as sketches.
A simple, sharp line is created based on a large area of shading. Low Threshold and High Threshold appear in the parameters so that you can adjust the threshold value of the adaptive range. Also, select “invert” for images that look like black lines on a white background.
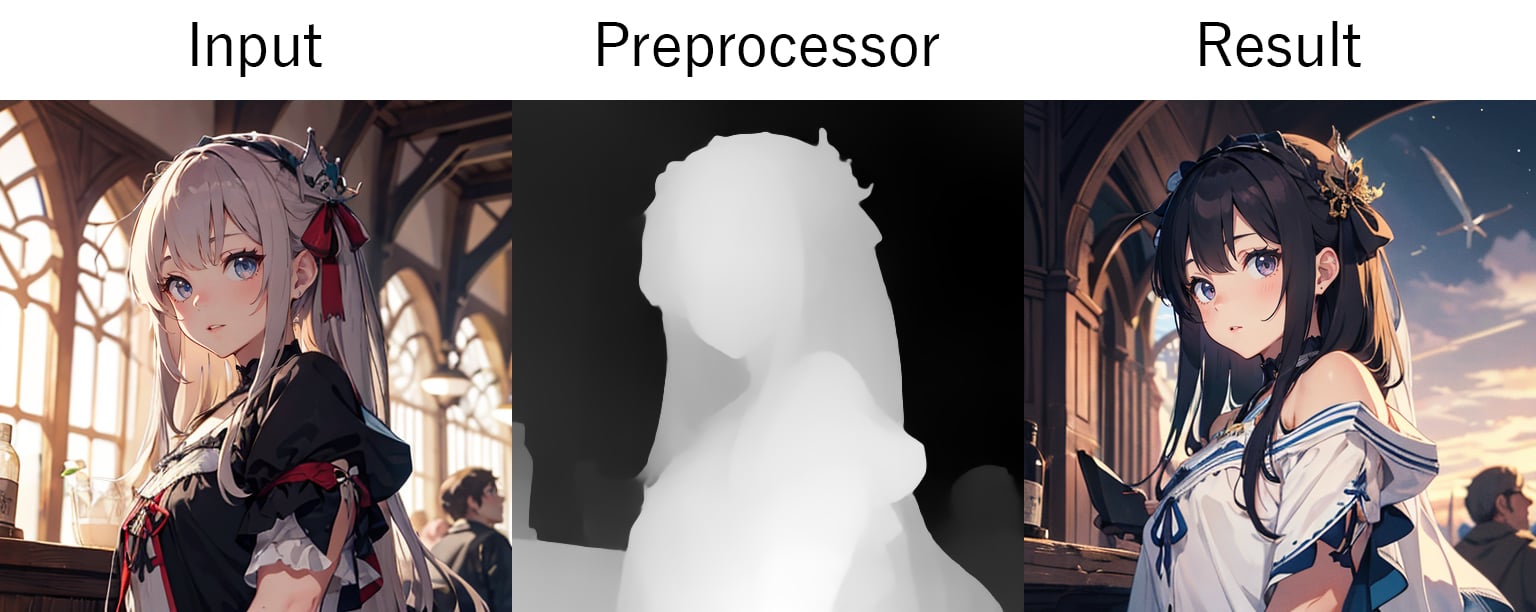
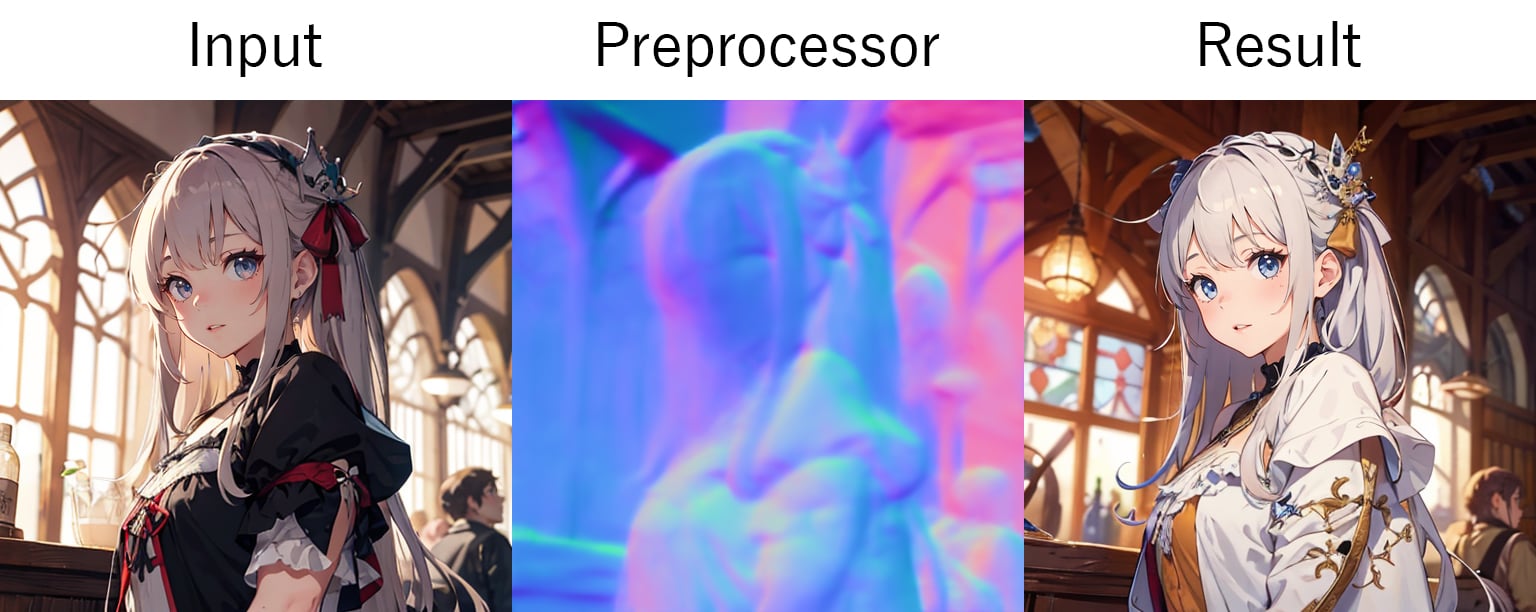
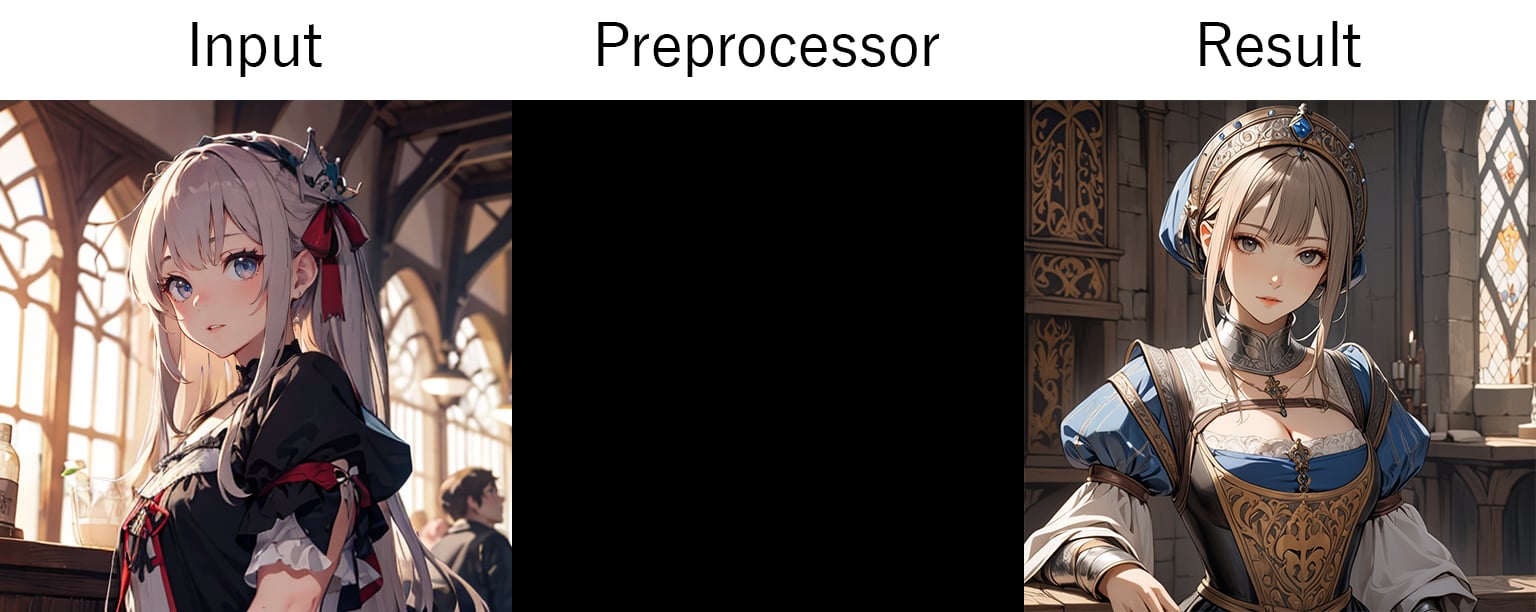
Depth:
- depth_midas: Depth detection using the MiDaS training dataset. v2.1 is used and is suitable for rewriting people.
- depth_zoe: Depth detection using the ZoeDepth training dataset. Soft edges, but detects medium depth.
- depth_leres++: Depth detection using LeReS + pix2pix training dataset. It detects even more detail than the normal version below. It produces a clear detect map.
- depth_leres: Depth detection using LeReS + pix2pix training dataset. Detection can go deep. Edges will be a little blurry. If you want to refer to the background of the input image as well, we recommend you to click here.
- depth_hand_refiner: Use MeshGraphormer + HRNets to modify the hands, using img2img’s Inpainting to specify the range of the hands.
- depth_anything_v2: Depth detection using the DINOv2 training dataset. It can be used to detect people clearly. Depth is similar to MiDaS.
- depth_anything: Depth detection using the DepthAnythingV2 training dataset. This is also recommended when you want to detect people.
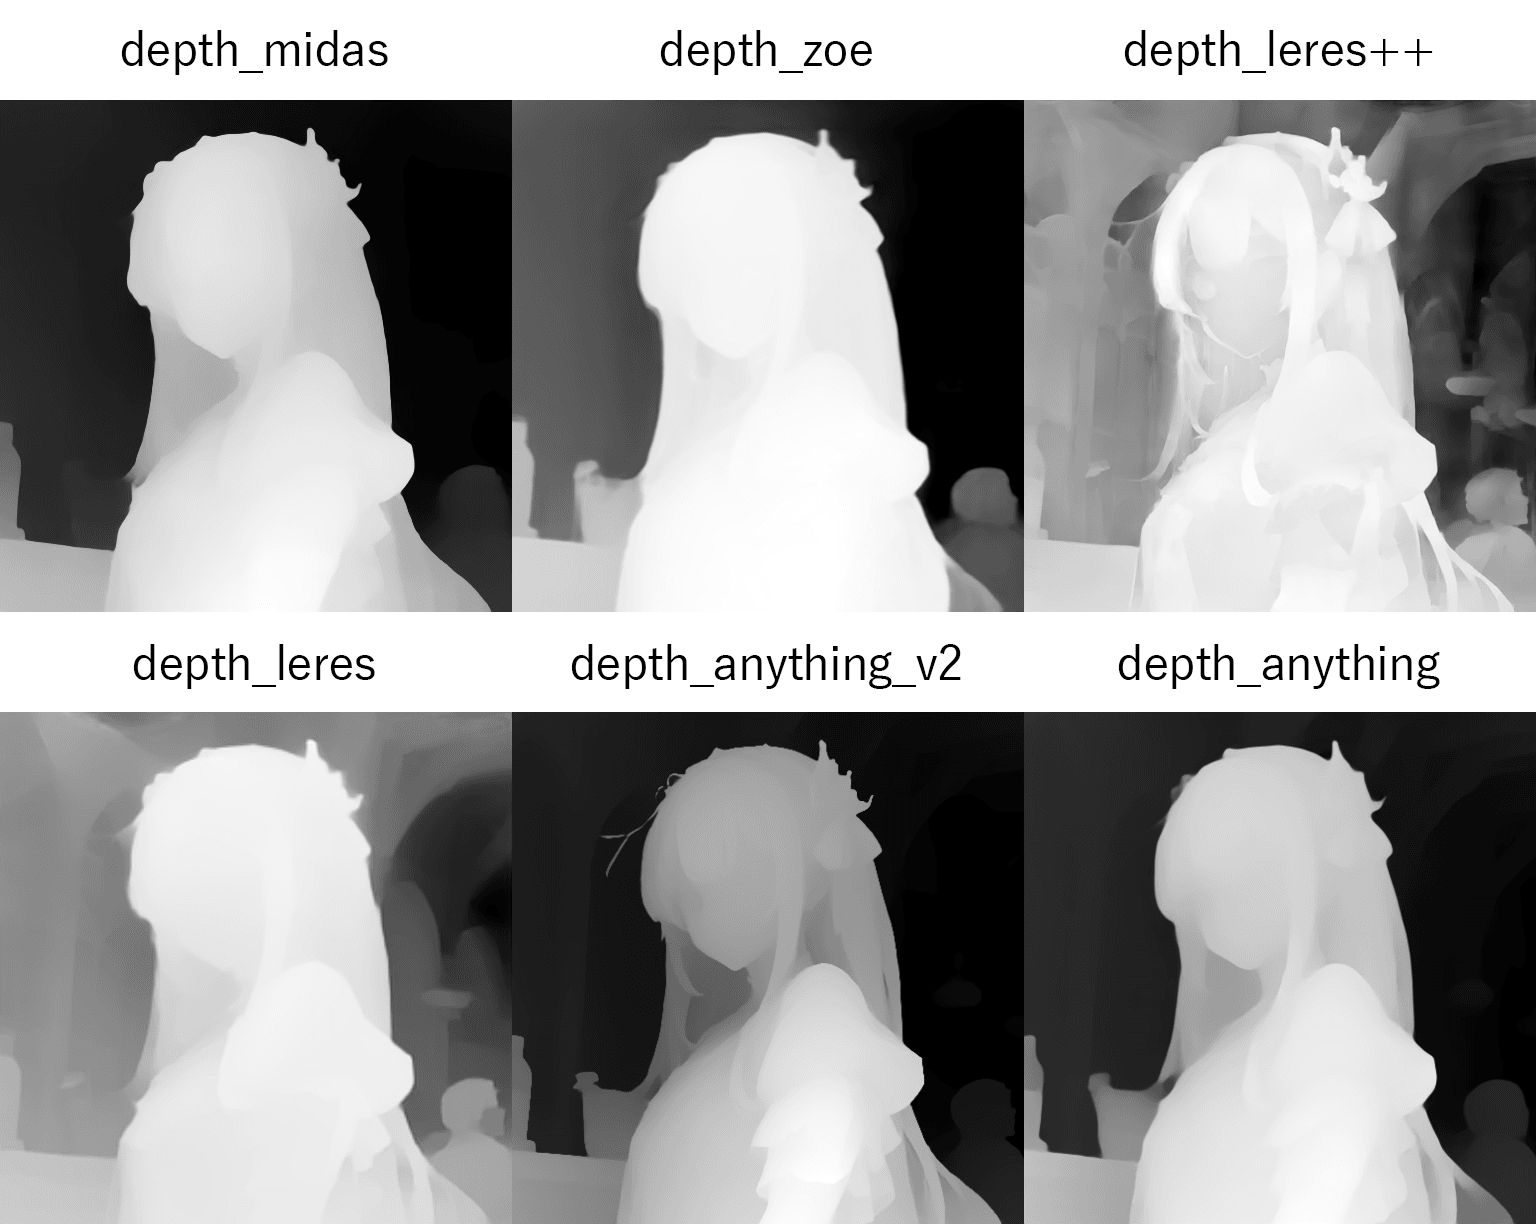
Analyzes the input image and creates a depth map. This is used to replace people and other objects.
IP-Adapter:
- ip-adapter-auto: Automatically selects the appropriate Preprocessor for the selected ControlNet model.
- ip-adapter_clip_h: Extract a person using CLIP ViT-H/14 – LAION-2B.
- ip-adapter_pulid: Extract the person using insightface embedding and CLIP embedding.
- ip-adapter_face_id_plus: Must be used with LoRA. Use the standard version of face ID and further use CLIP to clone only faces.
- ip-adapter_face_id: Must be used with LoRA; used to clone only faces using face ID.
- ip-adapter_clip_sdxl_plus_vith: Available for SDXL only; use CLIP ViT-H/14 – LAION-2B to extract the person.
- ip-adapter_clip_g: Available for SDXL only; use CLIP ViT-bigG/14 – LAION-2B to extract person.
IP-adapter (Image Prompt adapter) allows you to identify people in the input image and generate them in a new composition. You can select the weight type as Weight Type appears in the parameters. Some preprocessors of IP-Adapter must be used with LoRA. Photographs are recommended for input images, and illustrations will often not work well.
Inpaint:
- inpaint_only: For inpainting only, use here.
- inpaint_only+lama: Inpaints with LaMa; clearer generation than inpaint_only.
- inpaint_global_harmonious: Inpainting on A1111 Inpainting path. Use A1111 img2img with control net on.
The mask range specified for the input image can be rewritten at the prompt.
Instant-ID:
- instant_id_face_keypoints: Used in conjunction with the INSTANTID model “control_instant_id_sdxl”.
- instant_id_face_embedding: Use with ip-adapter model “ip-adapter_instant_id_sdxl”.
It is SDXL only, but it extracts a face from the input image and generates an illustration using that face as a reference. To use it, you need to download the ipadapter model and instantID model and set up each model using two UNITs.
InstructP2P:

Instruct Pix2Pix can rewrite the input image according to the prompts. Example: Changing a summer landscape to a winter landscape
Lineart:
- lineart_standard: It will be Lineart standard preprocessor.
- invert (from white bg & black line): This is Lineart’s standard preprocessor, but it is used for inverted images with a white background and black lines.
- lineart_realistic: Generate detect maps from photographs, realistic computer graphics, etc. Even the finest lines can be extracted.
- lineart_coarse: Generates a strong line detect map.
- lineart_anime_denoise: Generates a detect map from an animated illustration. Since this is a denoised version, fine lines are not extracted.
- lineart_anime: Generates a detect map from an animated illustration.

Creates a detect map with the outline of the input image. Suitable for illustration purposes, such as adding color to line drawings.
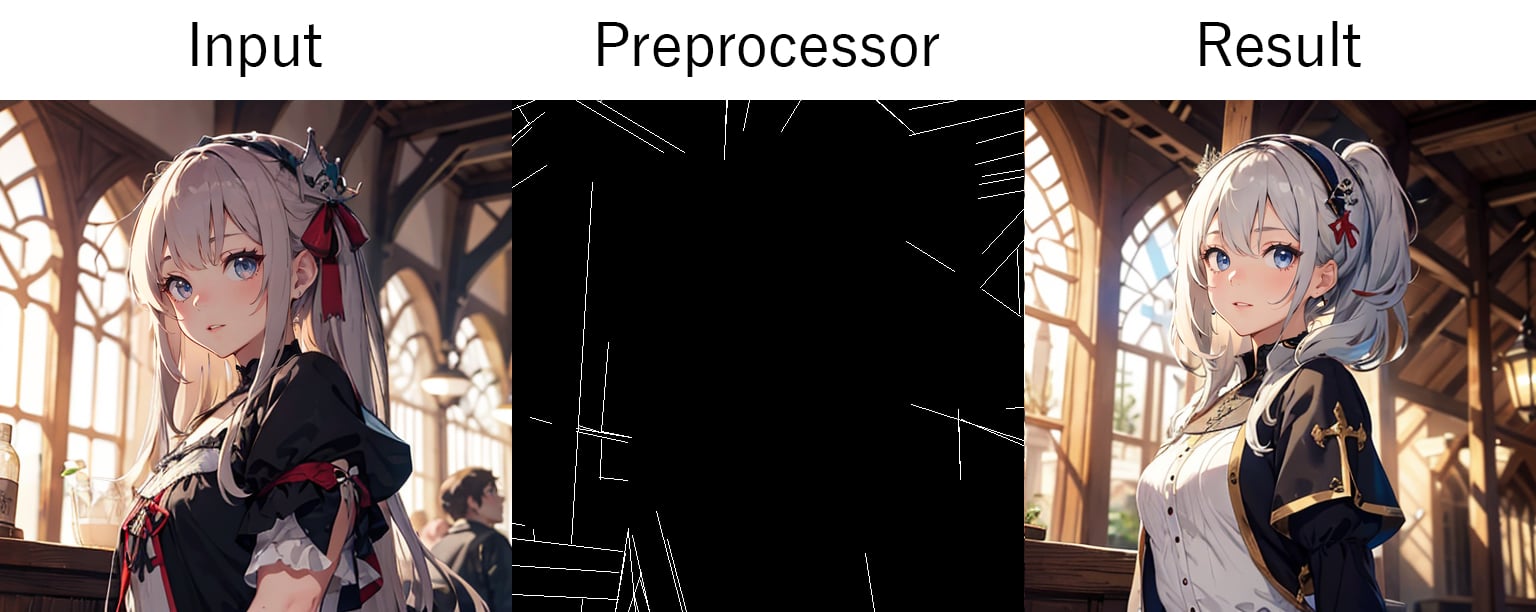
MLSD:
- mlsd: MLSD standard preprocessor.
- invert (from white bg & black line): If the input image has a white background + black lines, use here.
Mobile Line Segment Detection detects straight line segments in the input image and creates a detect map. It is suitable for buildings and artificial objects because it preserves perspective.
NormalMap:
- normal_bae: Generates a Bae normal map. Use when you want to include the background.
- normal_midas: Normal map with MiDaS. Use when you want to refer only to the person.
- normal_dsine: Only available for SDXL due to lack of SD1.5 model; produces higher quality normal maps than Bae. Control net model “bdsqlsz_controllite_xl_normal_dsine” is required.
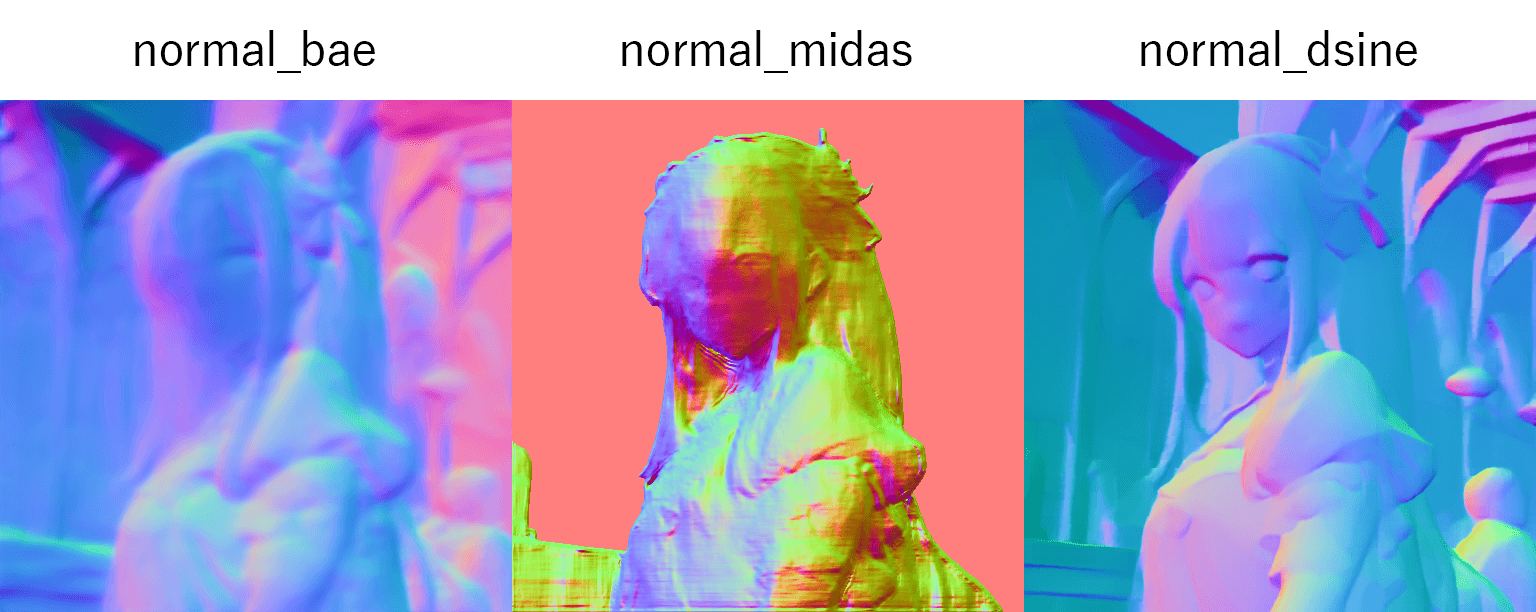
Creates a normal map of the input image, similar to Depth, but with texture and other details.
OpenPose:
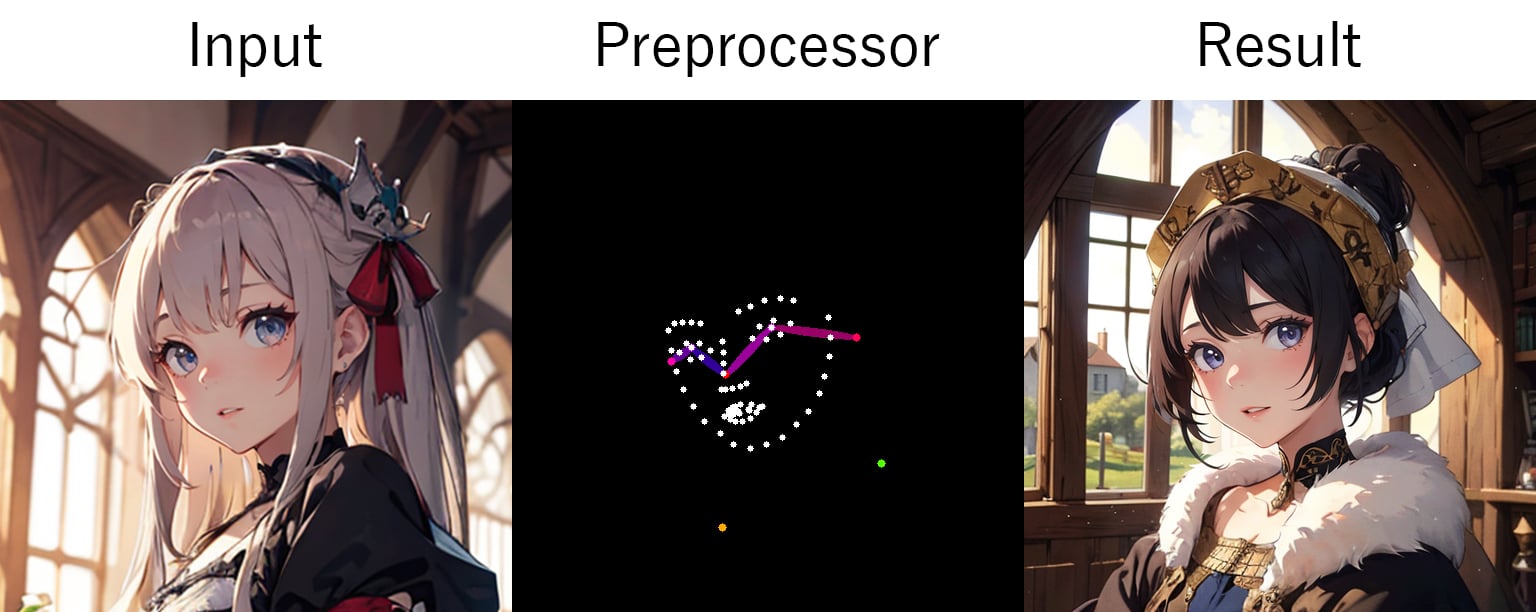
- openpose_full: Generate an OpenPose of the entire body.
- openpose_hand: In addition to the standard openpose, hands and fingers are also extracted.
- openpose_faceonly: Only the face is removed. Facial expressions, etc. are also removed.
- openpose_face: In addition to the standard openpose, face + facial expressions are extracted.
- openpose: Standard preprocessor. Extracts eyes, nose, ears, neck, shoulders, elbows, hips, knees, and ankles.
- dw_openpose_full: This is an enhanced version of openpose_full.
- densepose_parula (black bg & blue torso): DensePose is used to pick out the pose of a person. The dedicated model 🔗Controlnet for DensePose is required.
- densepose (pruple bg & purple torso): DensePose is used to pick out the pose of a person. The dedicated model “🔗Controlnet for DensePose” is required.
- animal_openpose: It is used for extracting it from an animal. A special model “🔗animal_openpose” is required.
Creates an OpenPose skeleton from the person in the input image. Use this when you want to use the pose of the person.
Recolor:

- recolor_luminance: Color based on the brightness of the input image.
- recolor_intensity: Color based on the color intensity of the input image.

You can change the color of the input image or colorize a black-and-white photo. The preprocessor can be selected from two options: luminance or color intensity.
Reference:
- reference_only: Loads the input image as an attention layer.
- reference_adain+attn: Transfer styles using Attention and AdaIN (Adaptive Instance Normalization).
- reference_adain: Transfer styles using AdaIN.
Use the input image as a reference. Control Net Model is not used. Style Fidelity appears as a parameter, so you can set the style fidelity only when Control Mode is set to Balanced.
Revision:
- revision_clipvision: Standard preprocessor. Prompts are also affected.
- revision_ignore_prompt: Prompts are ignored and only CLIP parsed prompts are used.
SDXL only, but the input image is generated based on the prompts generated by analyzing the prompts using CLIP. Since the input image is not used, a completely different illustration may be generated.
Scribble:
- scribble_pidinet: Pixel Difference network (Pidinet) is used to pick out contours. It generates the simplest detect map of them all.
- invert (from white bg & black line): Used for input images with white background & black lines.
- scribble_xdog: Extracts contours using EXtended Difference of Gaussian (XDoG). Generates a detail-detected map.
- scribble_hed: Use Holistically-Nested Edge Detection (HED) to pick out contours. Use it to change colors and styles.
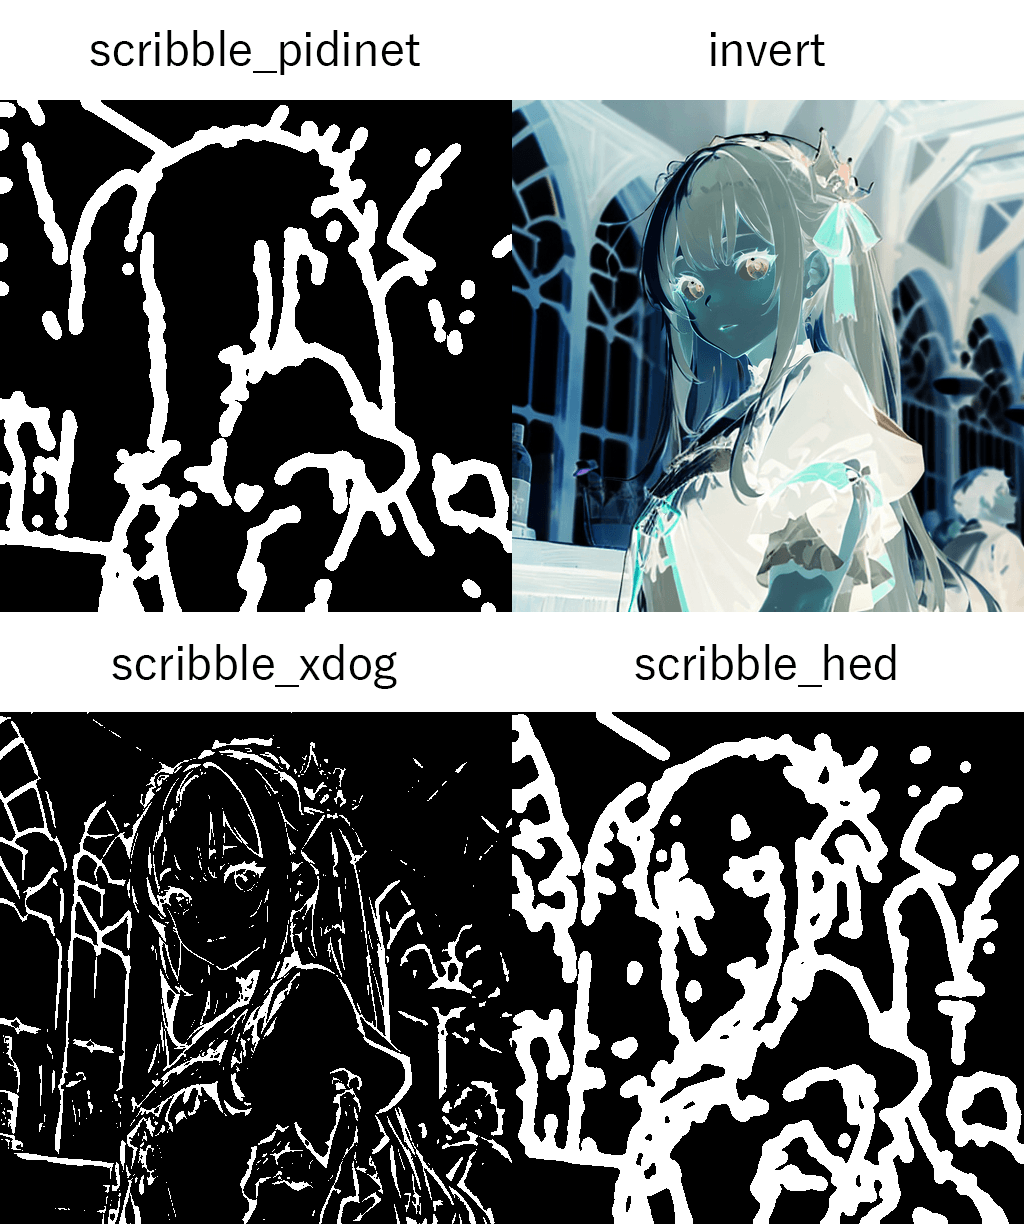
Use when entering sketches or line art. Creates a clean line detect map.
Segmentation:
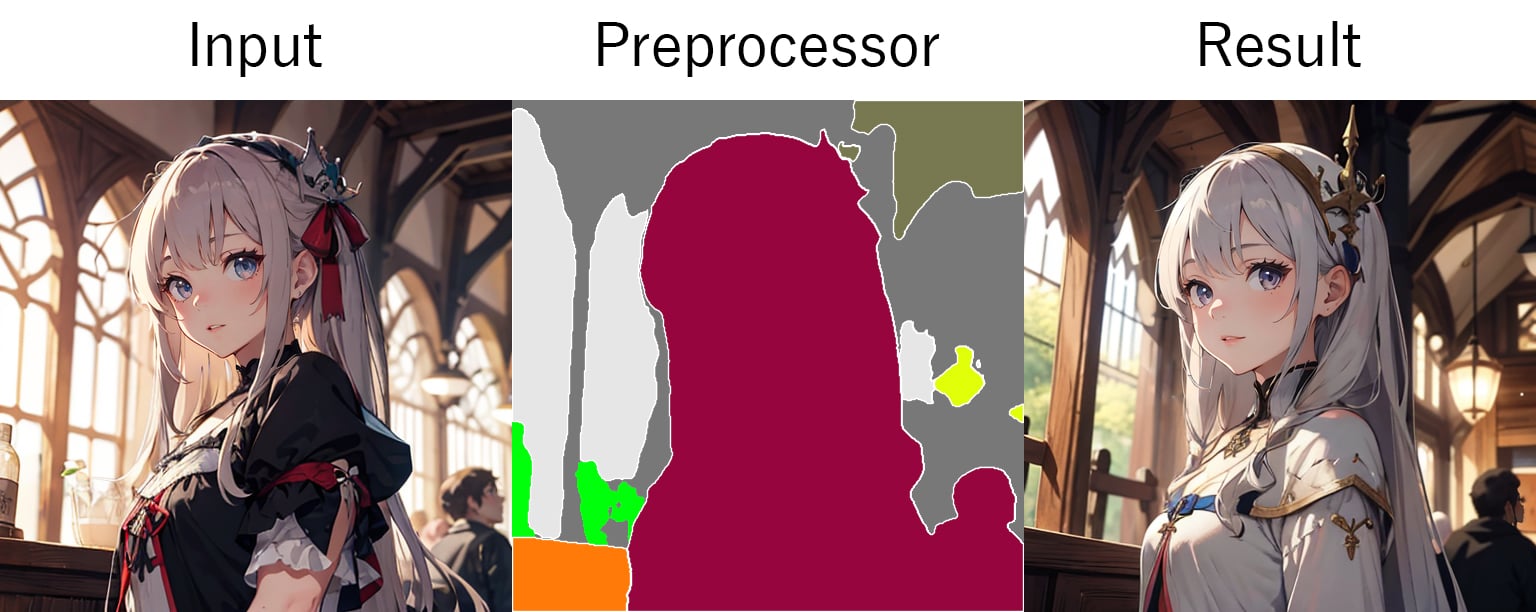
- seg_ofade20k: Split using UniFormer (uf) trained on the ADE20K dataset.
- seg_ufade20k: Split using OneFormer (of) trained on the ADE20K dataset.
- seg_ofcoco: Split using OneFormer (of) trained on the COCO dataset.
- seg_anime_face: SDXL only, but used for anime-style input images. A special model “🔗bdsqlsz_controlllite_xl_segment_animeface.safetensors” is required.
- mobile_sam: MobileSAM is used for division. *It was added in Controlnet v1.1.455, but We could not use it on our environment due to an error.
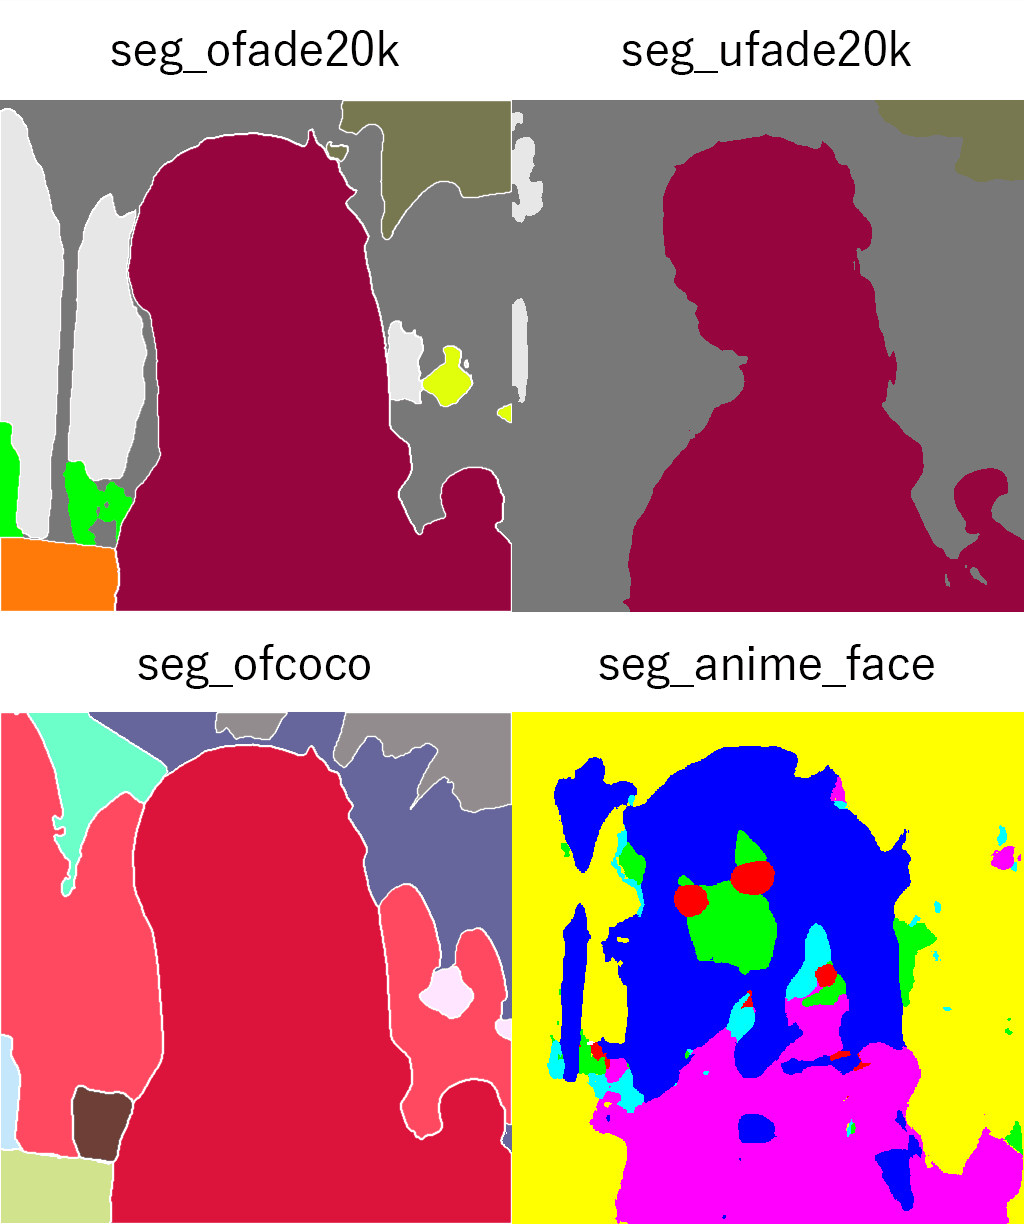
Creates a detect map divided based on the colors and shades of the input image.
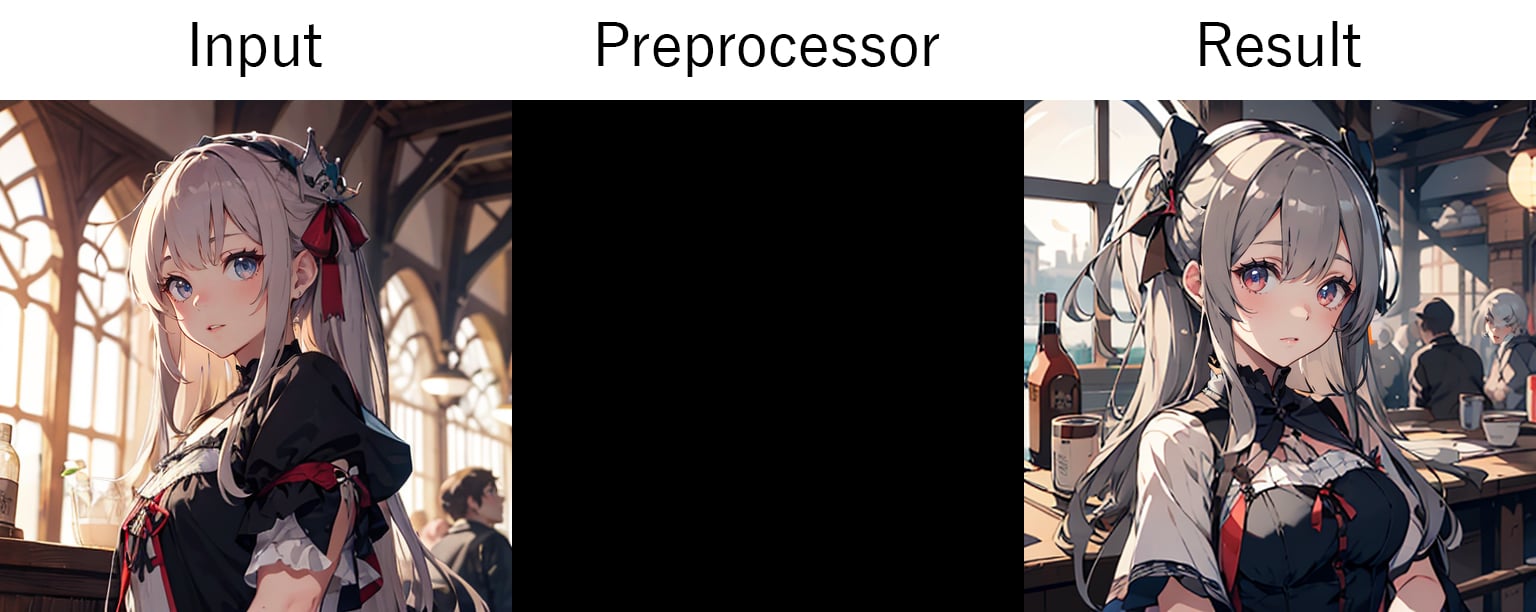
Shuffle:
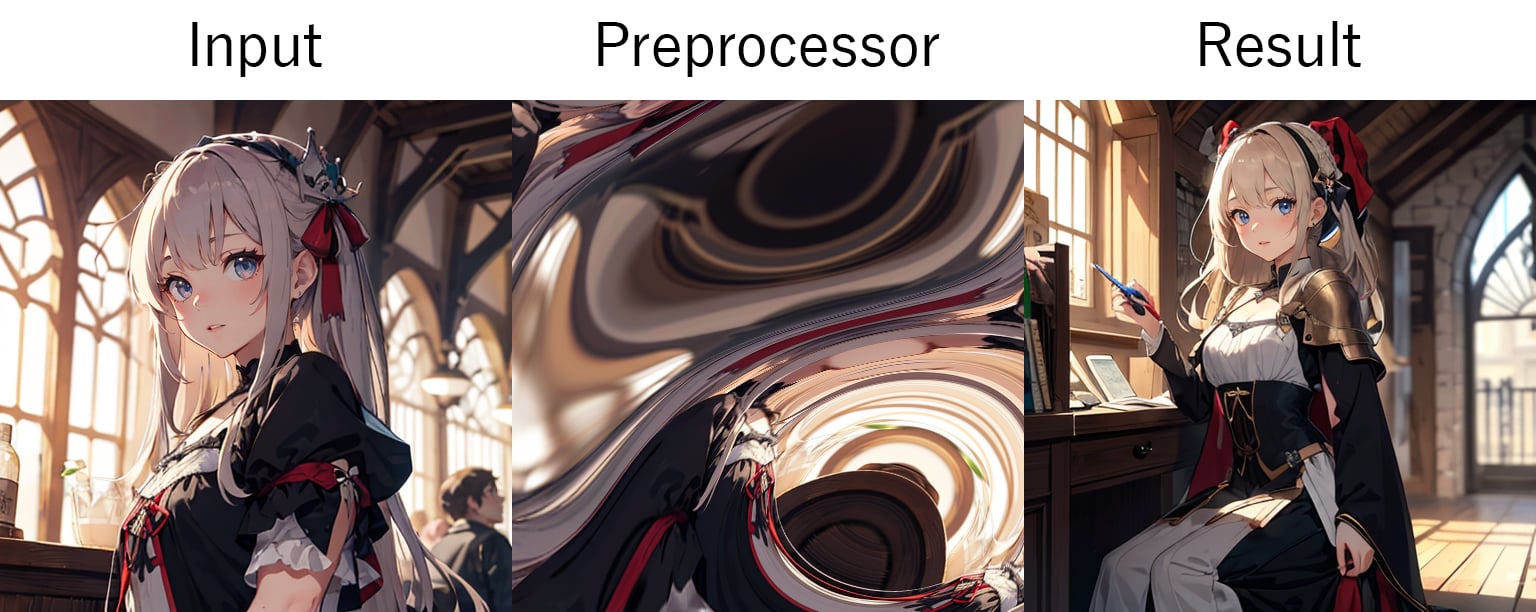
- shuffle
Jumble up the input image and transfer the color scheme and style from there. If you want to keep the original composition, set Preprocessor to none.
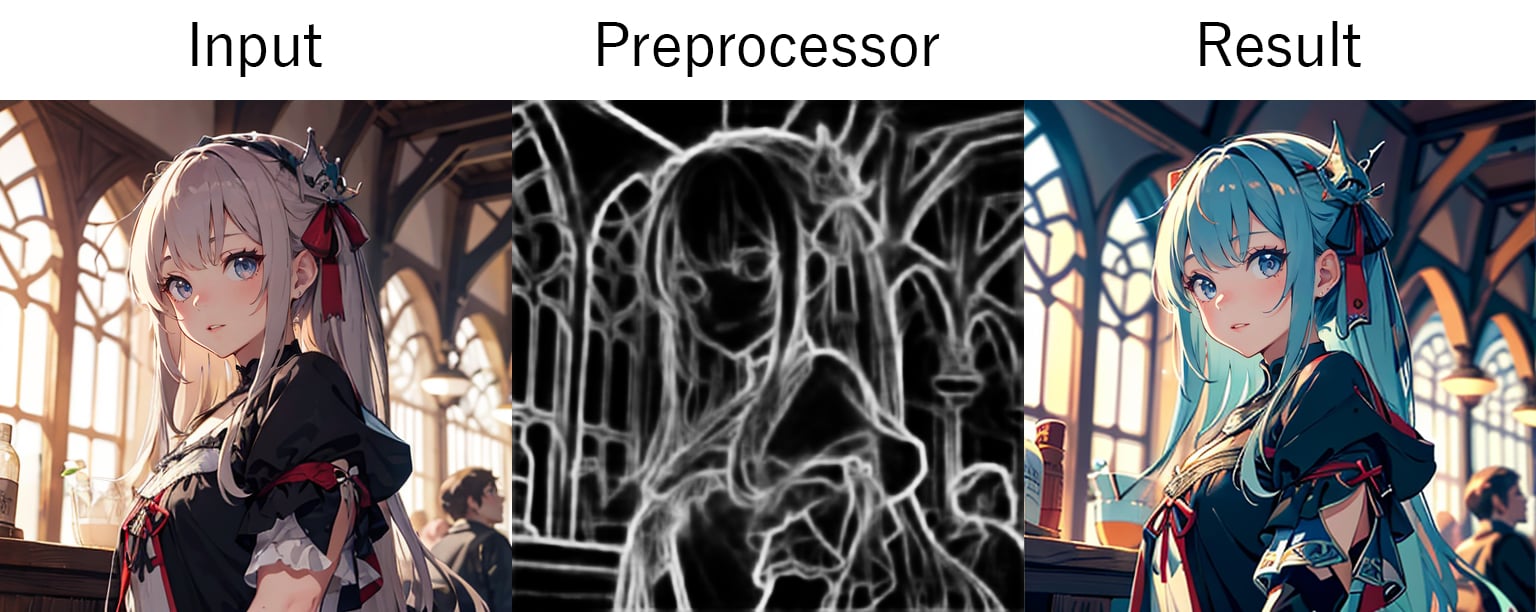
SoftEdge:
- softedge_pidinet: Pixel Difference Convolution (table5_pidinet) is used to pick out contours.
- softedge_teed: Extracts contours using the Tiny and Efficient Edge Detector (TEED). Generates a detail-retracted map.
- softedge_pidisafe: Pidinet’s safe type provides pre-quantized protection for areas that would otherwise disappear by default. Detect map is a map with less gradation than pidinet.
- softedge_hedsafe: It is a safe type of HED. Detect map is a less gradient map than HED.
- softedge_hed: Extract contours using Holistically-Nested Edge Detection.
- softedge_anyline: Use Anyline to pick out contours.
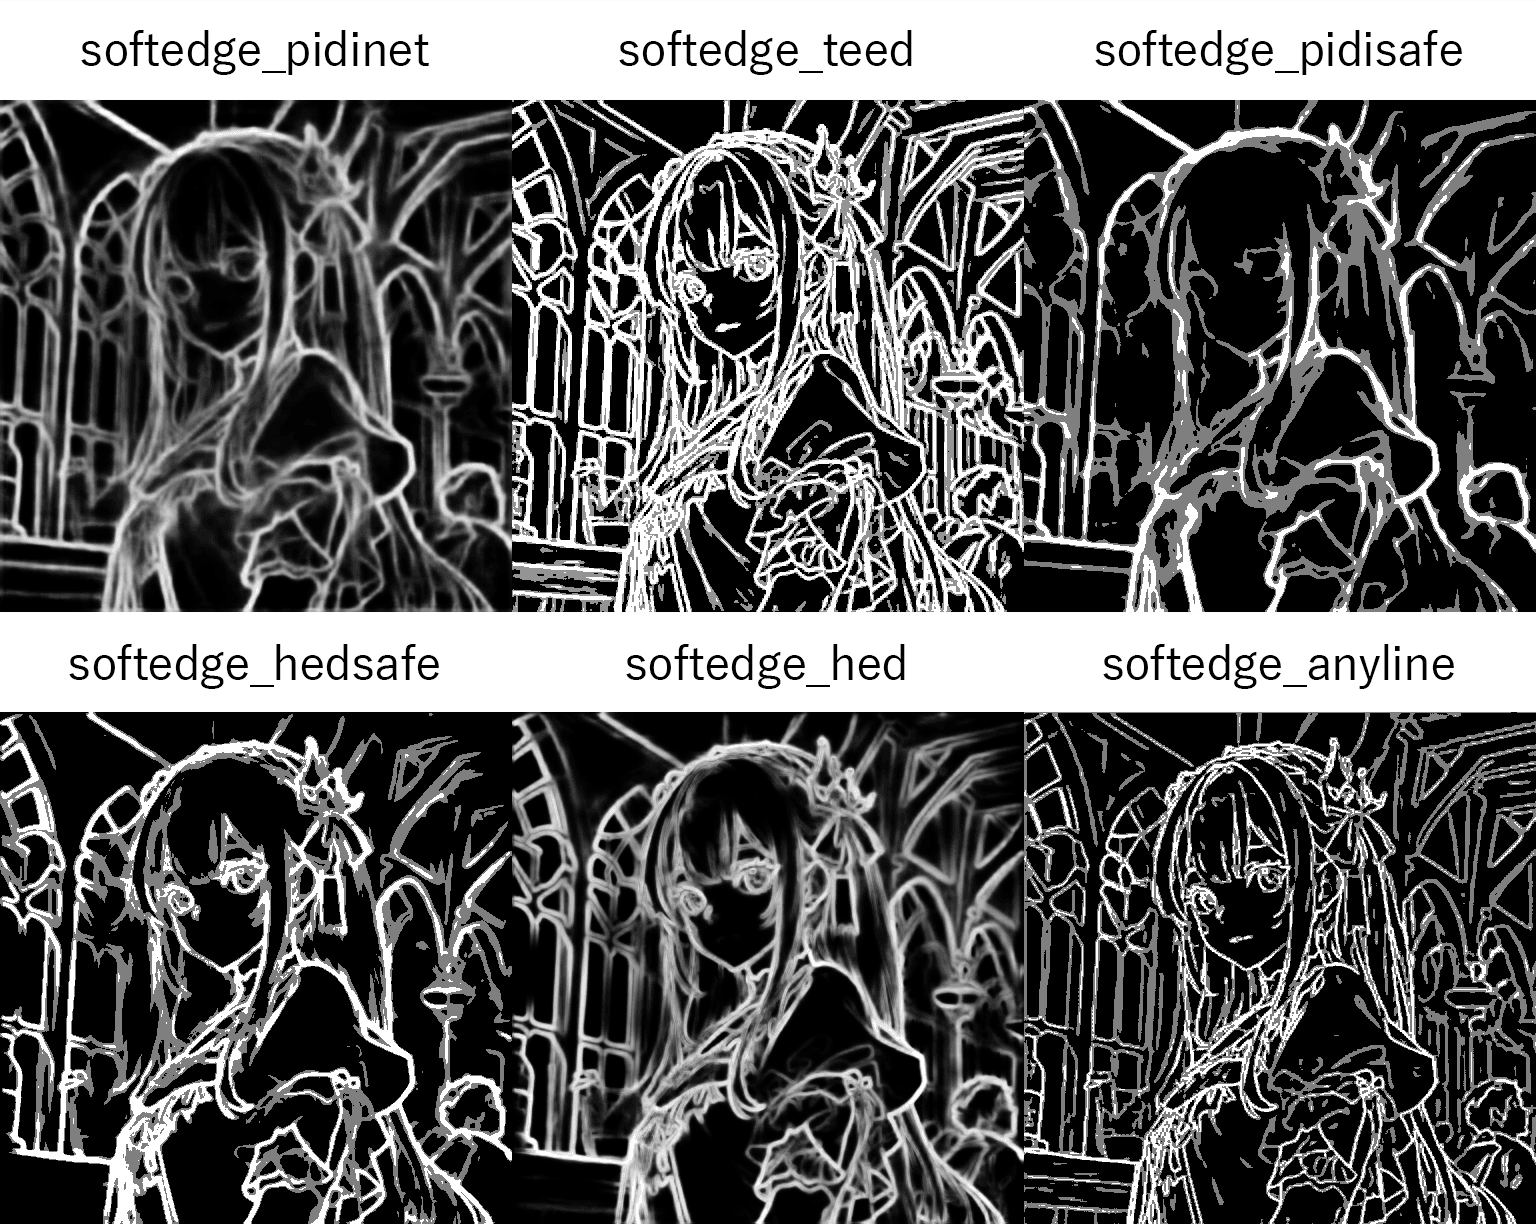
Creates smooth lines around objects in the input image.
SparseCtrl:
Preprocessor- scribble_pidinet: Generate a detect map using Pidinet.
- scribble_xdog: Generate a detect map using XDoG.
- scribble_hed: Use HED to generate a detect map.
Used to generate text2video with AnimateDiff. It can generate smooth animations.
T2I-Adapter:
- t2ia_style_clipvision: CLIP vision is used to generate embedding.
- t2ia_sketch_pidi: Generate a detect map using Pidinet.
- t2ia_color_grid: Generates a color palette for the input image.
T2I-Adapter is lighter and faster than ControlNet. download models from TencentARC/T2I-Adapter. style/sketch/color is available.
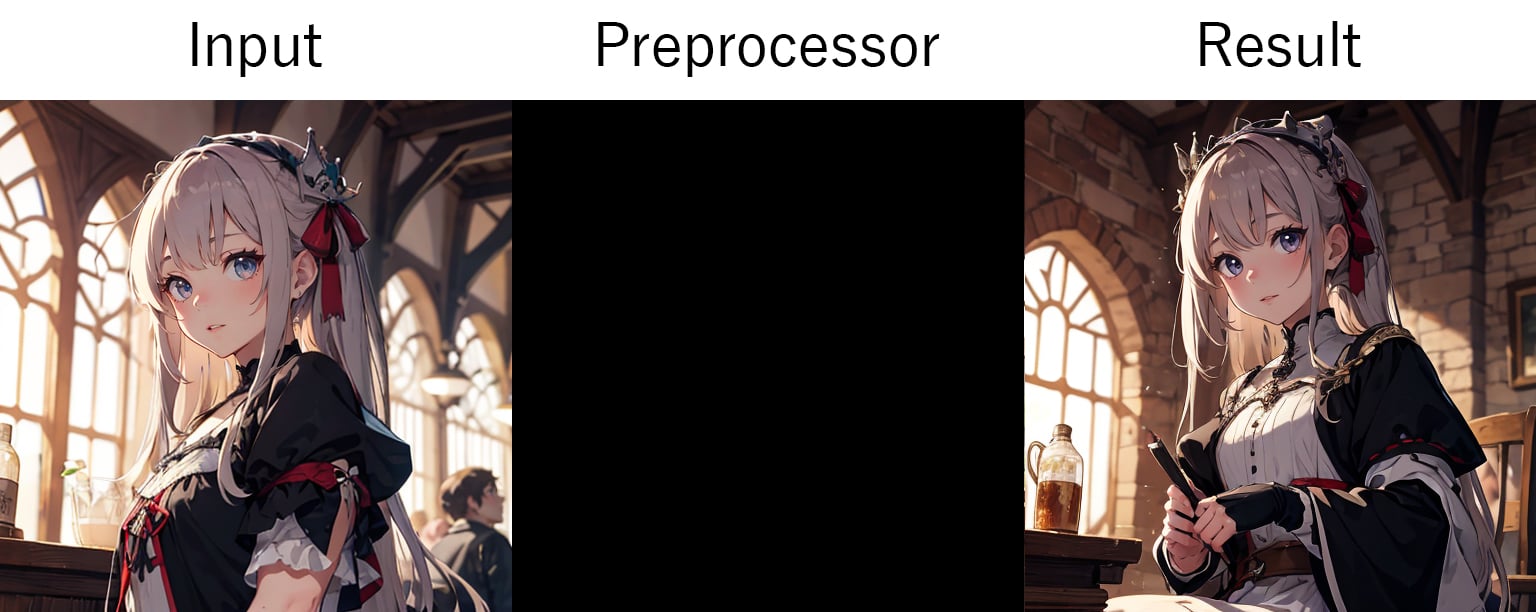
Tile:
- tile_resample: Standard preprocessor. Tile sampling of the input image.
- tile_colorfix+sharp: Tile sampling while maintaining color and sharpness.
- tile_colorfix: Tile sampling while maintaining color.
- blur_gaussian: Blurred tile sampling.
It is used to divide the input image into tiles and then process each tile individually to achieve finer detail. it is also used for upscaling in conjunction with SD ultimate upscale.
Examples of ControlNet Usage
Compositional Reference
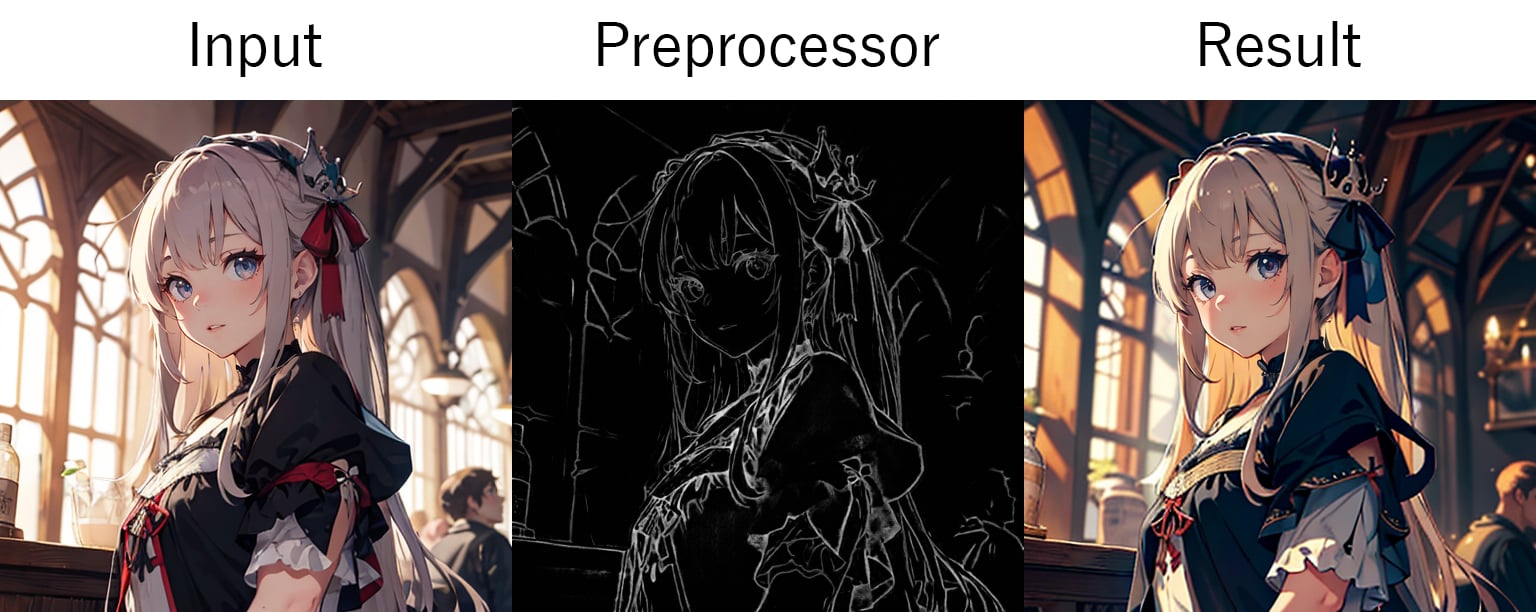
There are several ways to reference composition in ControlNet, and here we will use one of them, Depth, to rewrite the person.
-
Load the input image.
Download or generate the above input images and load them into the input.

Prompt: 1girl, medieval Negative prompt: EasyNegative Steps: 20, Sampler: DPM++ 2M, Schedule type: Karras, CFG scale: 7, Seed: 3801941407, Size: 768x512, Model: darkSushiMixMix_225D, VAE: vae-ft-mse-840000-ema-pruned.safetensors, Clip skip: 2, Version: v1.10.1 - Turn on the parameter “Enable” to activate the control net.
- Turn on the parameter “Pixel Perfect” to automatically adjust the input image to the size of the generated image.
- In this case, we want to create a detect map using Depth, so we select
Depthfor “Control Type”. - Change “Preprocessor” to
depth_anything_v2and selectcontrol_v11f1p_sd15_depthfor “Model”. - Set the “Control Weight” to
0.85, a slightly lower weight. This completes the control net settings. Next, set the generation parameters. -
Enter the following prompt at the positive prompt.
knight, ultra detailed, masterpiece -
Then enter the following prompt at the negative prompt.
worst quality, low quality, normal quality, lowres - Set the generated size to
Width: 768, Height:512. - Other parameters can be left as default. Click on the “Generate” button to generate.
We hope you have now generated an illustration in which the person has been transformed into a knight. Once you have generated an illustration that you like, you can copy the Seed and upscale it using Hires.fix.
Final result of Compositional Reference example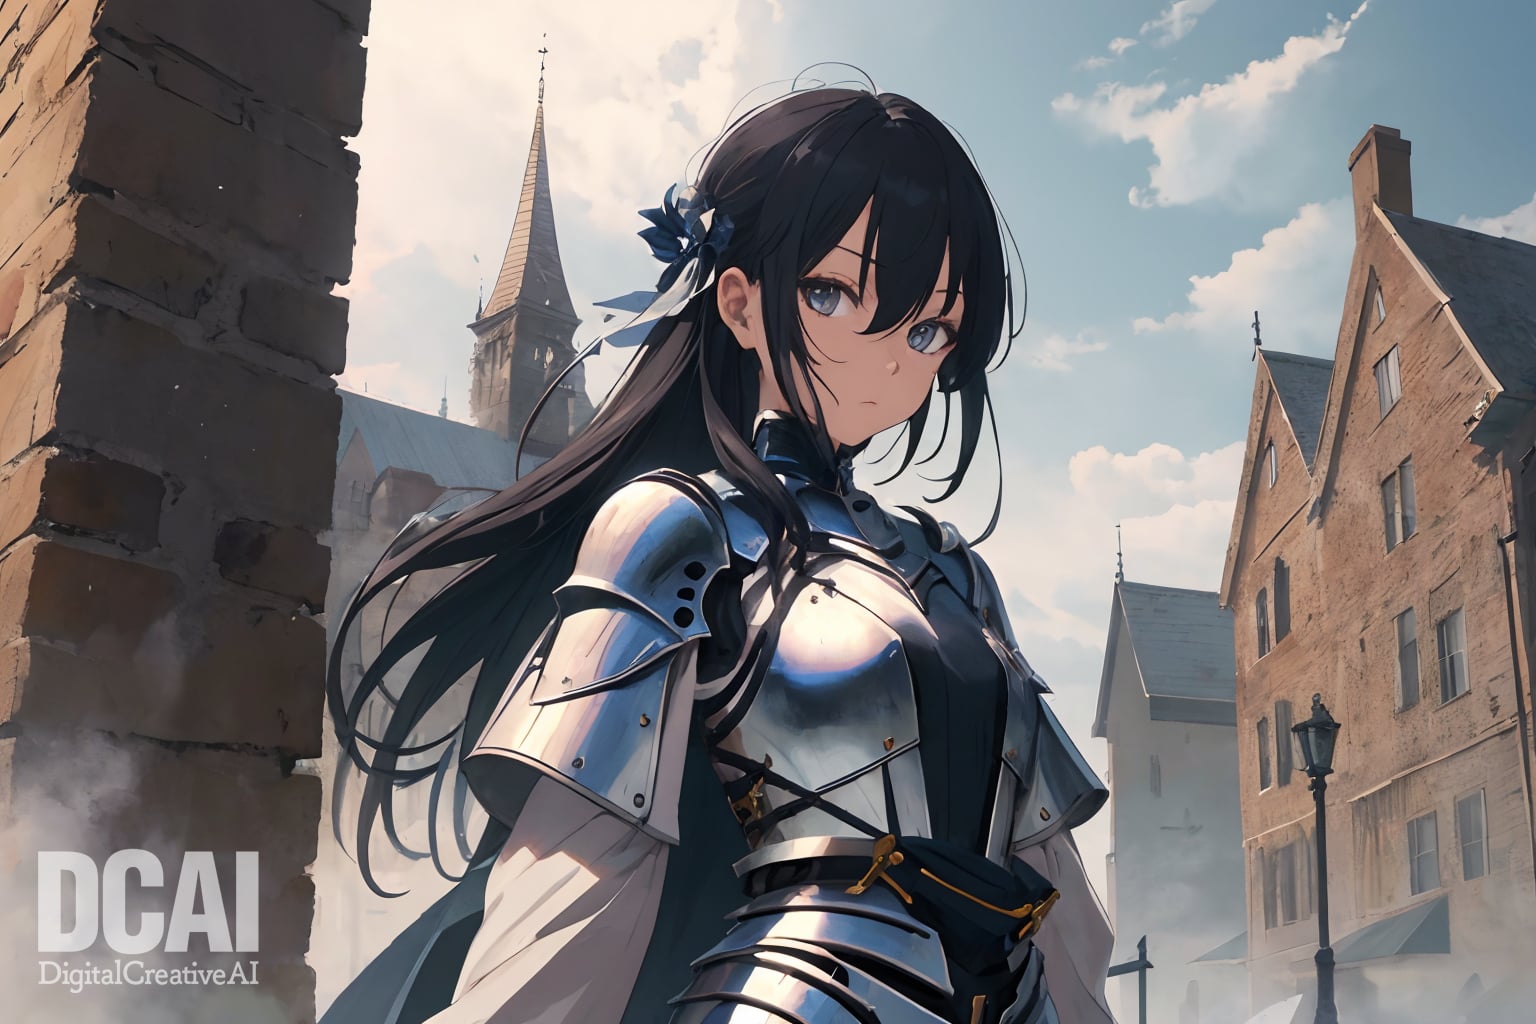
Person Reference
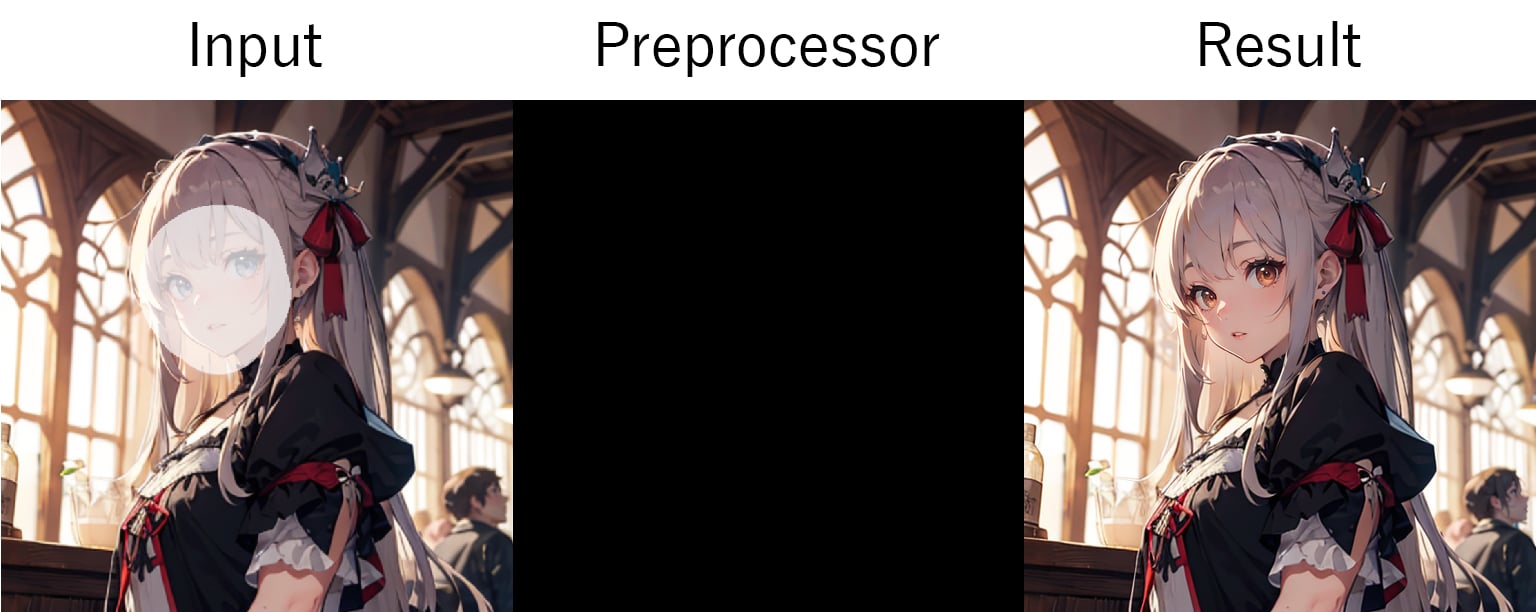
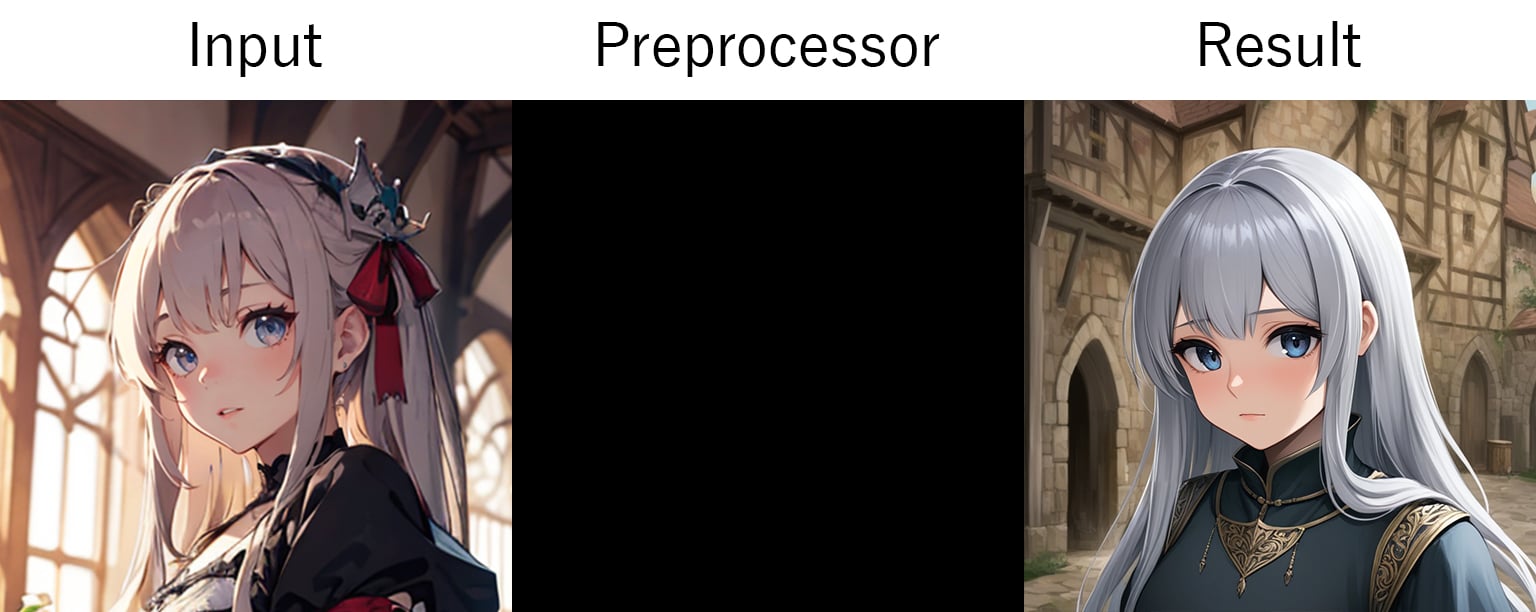
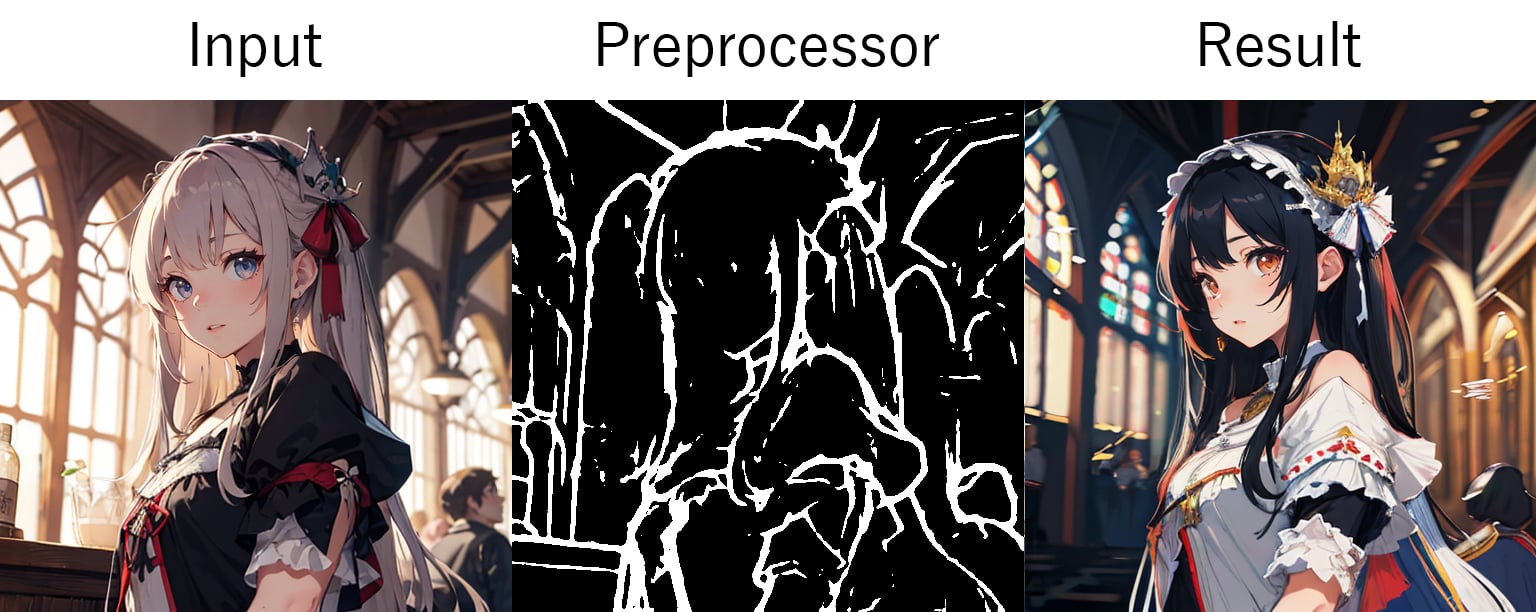
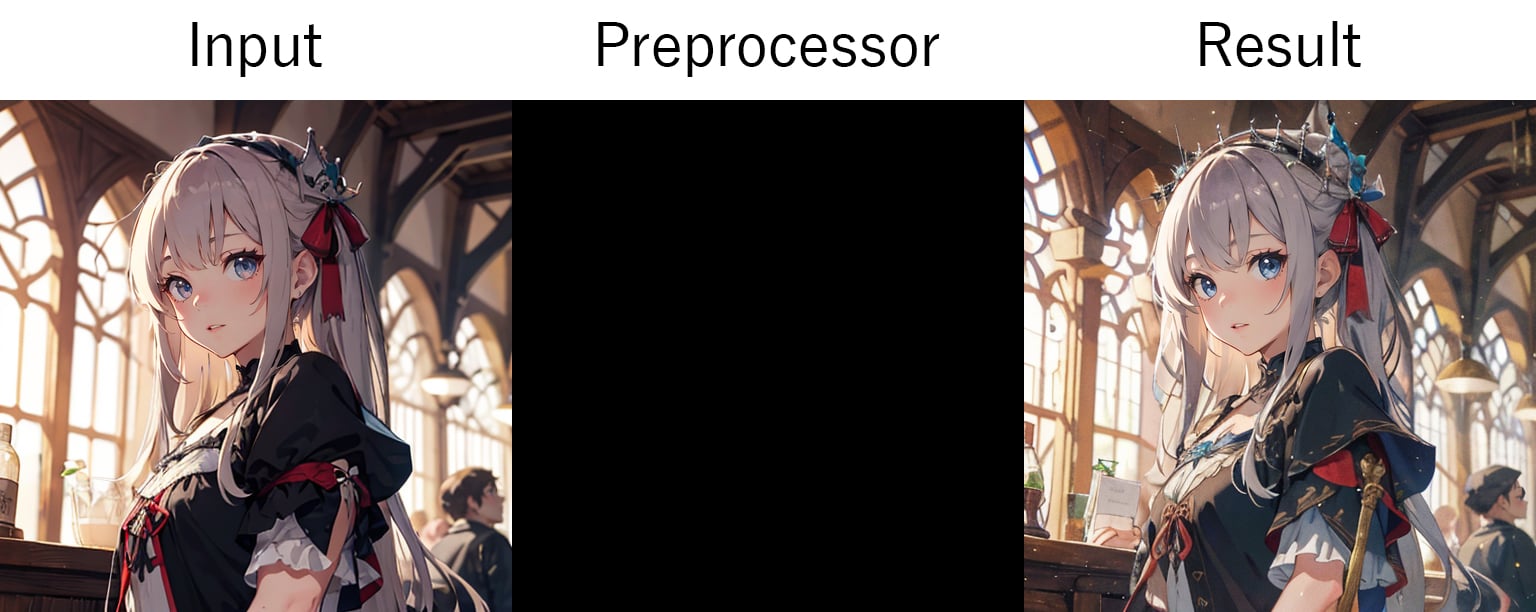
When referring to a person, use IP-Adapter or Instant-ID. In this article, we will explain how to use IP-Adapter to generate images using illustration input images, which is a difficult task. The control net model is “ipAdapterAnimeFine_v10”, so download it. Also, ADetailer is used in the procedure. It is recommended to install ADetailer, although it is fine without it.
- Let’s load the input image.

Prompt: 1girl, solo, cute face, (simple background:1.1), upper body, medieval, hyper detailed, masterpiece Negative prompt: nsfw, worst quality, low quality, normal quality, lowres Steps: 20, Sampler: DPM++ 2M, Schedule type: Karras, CFG scale: 4, Seed: 580272187, Size: 512x512, Model: darkSushiMixMix_225D, VAE: vae-ft-mse-840000-ema-pruned.safetensors, Clip skip: 2, ADetailer model: face_yolov8n.pt, ADetailer confidence: 0.3, ADetailer dilate erode: 4, ADetailer mask blur: 4, ADetailer denoising strength: 0.4, ADetailer inpaint only masked: True, ADetailer inpaint padding: 32, ADetailer version: 24.9.0, Version: v1.10.1 - Activate the parameters “Enable” and “Pixel Perfect”.
- Since we want to refer to a person using an illustration-based input image, select
IP-Adapterfor “Control Type”ip-adapter_clip_hfor “Preprocessor” andipAdapterAnimeFine_v10for “Model”. - Set “Control Weight” to
0.6because of the strong influence of the control net. - We want you to write a few elements, so set “Ending Control Step” to
0.9. -
Now that you have set up your control net, the next step is to enter the following at the positive prompt.
medieval, outdoor, sky, mountain, hyper detailed, masterpiece -
Then enter the following in the negative prompt.
nsfw, worst quality, low quality, normal quality, lowres - Set the generated size to
Width: 768, Height:512. - Set “CFG Scale” to
4, as this will produce a high-contrast image. - Turn on ADetailer if installed.
The above should generate an illustration of the input person on the mountain. It is difficult to reference the character perfectly because of the quirks of the control net model, but we recommend using ADetailer to get a little closer to the checkpoint model.
Final result of Person Reference example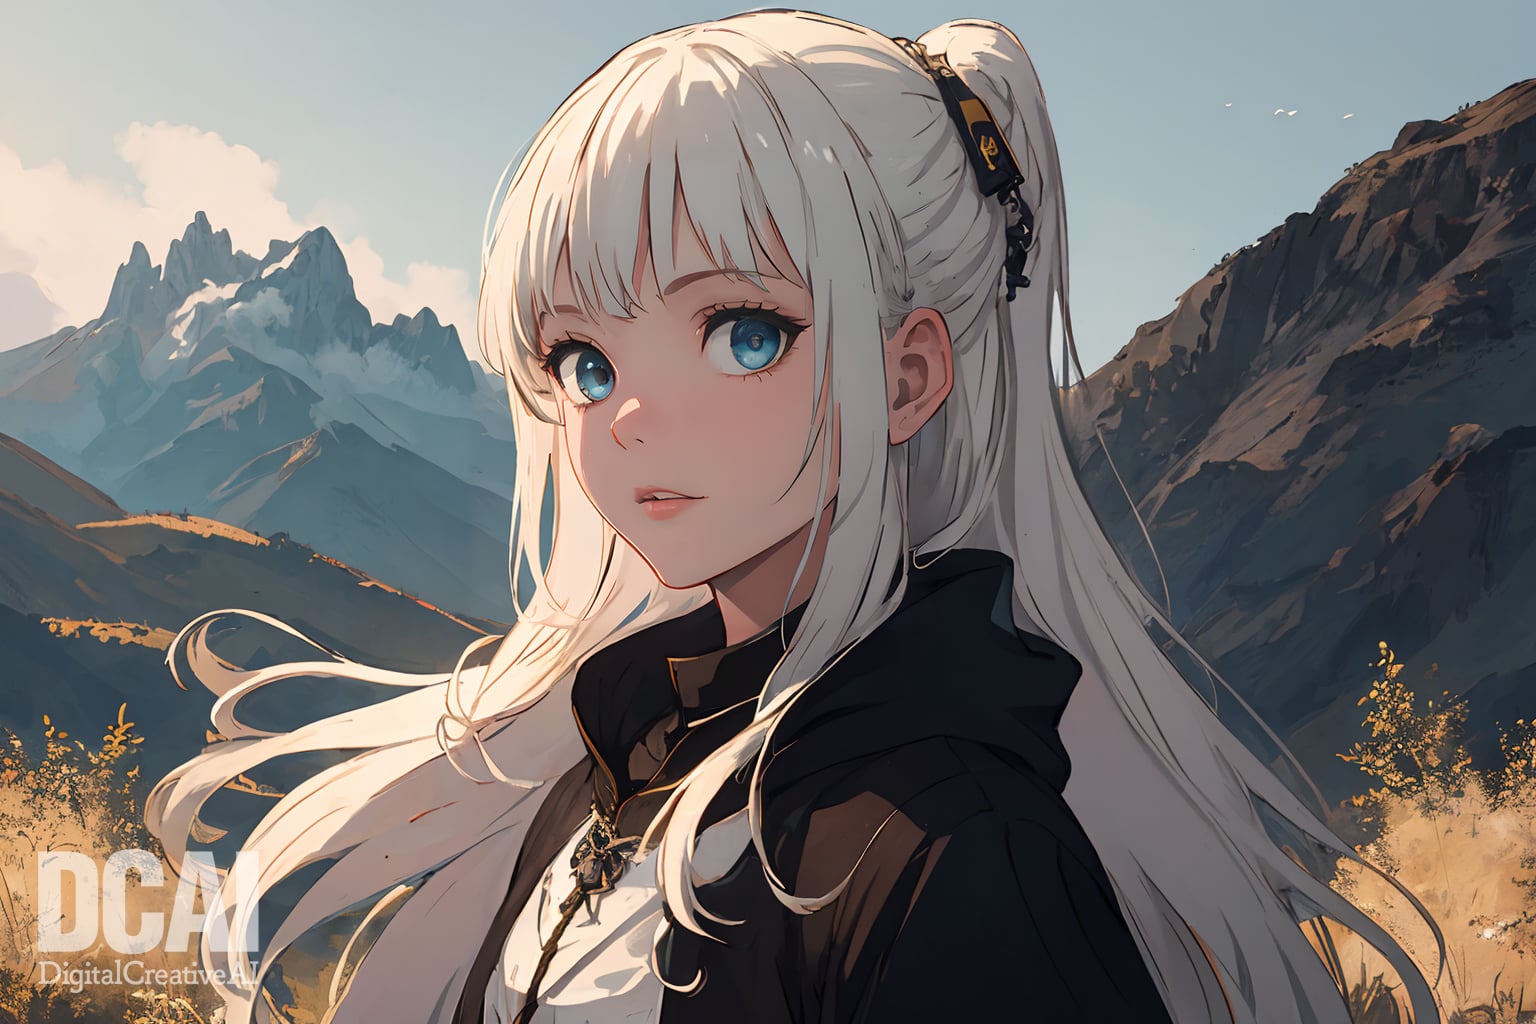
Pose Reference
Openpose allows you to analyze and reference the pose of a person from the input image.
- Input image borrowed from Unsplash 🔗two women standing near green plants and string lights during daytime. Drag or click to load this photo onto the canvas. Download the size middle or S.

- Activate the parameters “Enable” and “Pixel Perfect”.
- Since OpenPose is used in this case, select
OpenPosefor “Control Type”. - For “Preprocessor,” select the high-performance version
dw_openpose_fullbecause you want to analyze multiple people. - For “Model,” select
control_v11p_sd15_openposesince it is generated by SD1.5. - Now that we’re here, let’s create a skeleton from the input image and press the 💥 button next to Preprocessor to analyze it.
- Once you have the analysis results, press the edit button in the Preprocessor Preview area to open the editor.

- Since what we want to generate is a back view, the face part can be obtrusive, so we delete it.
- Let’s start by editing Person 1 in the Pose Control; click on the > next to Person 1 to see a list of points.
- First, delete the expression point by pressing the x button to the left of Face. Then hide the eyes with the eye button next to nose. Then, hide right_eye/left_eye/right_ear/left_ear at the bottom.

- Person 2 hides the face in the same way.
- When you have finished modifying the skeleton, confirm with “Send Pause to ControlNet” at the top.

- Let’s use multiple control nets in this example. Click on “ControlNet Unit 1” in the Units tab to set up the second control net.
- The input image reads the same image as Unit 0.
- Activate the parameters “Enable” and “Pixel Perfect”.
- For “Control Type,” select
Depth, and for “Preprocessor,” usedepth_anything_v2. For “Model,” selectcontrol_v11f1p_sd15_depth. That’s all for the control net settings. -
Next, enter the following at the positive prompt.
art, correct perspective, olive tree plantation, medieval, hyper detailed, masterpiece -
Then enter the following in the negative prompt.
face, worst quality, low quality, normal quality, lowres - Set the generated size to
Width: 768, Height:512. - Set “Sampling steps” to
30. The rest of the parameters can be left as default. -
Press the “Generate” button to start generating. When you have generated a composition you like, enter the following value in the Hires.fix and upscale it with the ✨ button in the preview area.
Hires. fix: off
Upscaler: R-ESRGAN 4x+
Hires steps: 15
Denoising strength: 0.35
Upscale by: 2
We believe that the above generated the illustration to which the pose refers.
Final results for Pose Reference example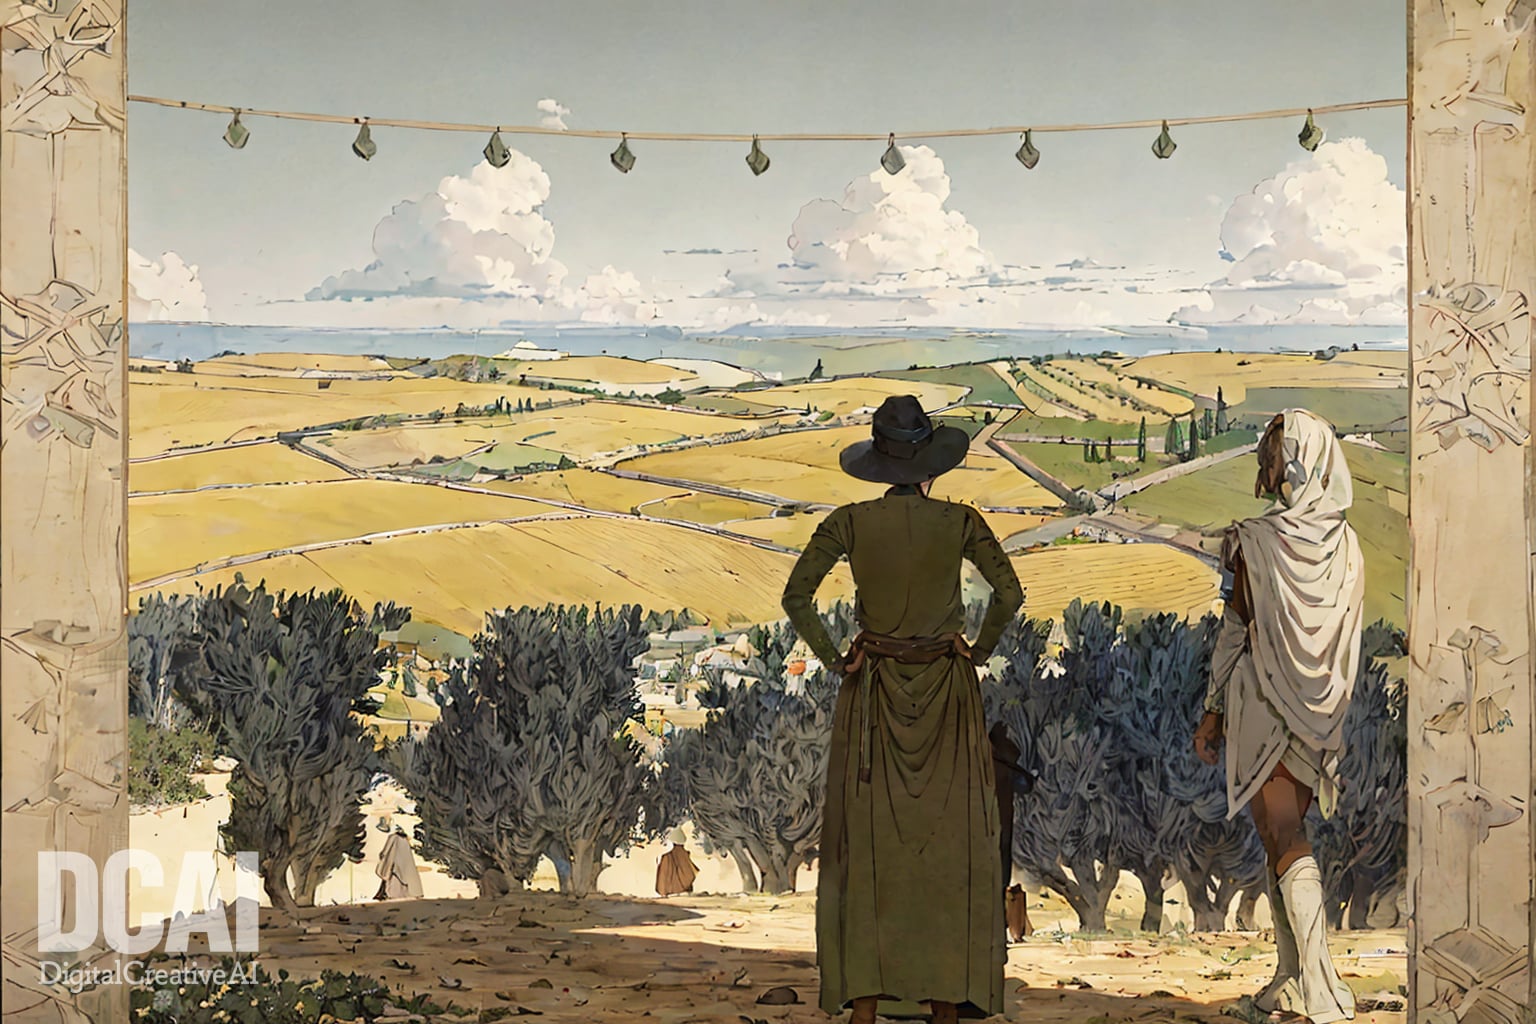
Refinement of the generated image
Use Tile to refine the generated image in the control net. Also, upscaling will be explained in the second half using SD ultimate upscale.
-
Load the input image.
Download or generate the above input images and load them into the input.

Prompt: floating island, ultra detailed, masterpiece Negative prompt: worst quality, low quality, normal quality, lowres, text Steps: 20, Sampler: DPM++ 2M, Schedule type: Karras, CFG scale: 7, Seed: 865422851, Size: 768x512, Model: darkSushiMixMix_225D, VAE: vae-ft-mse-840000-ema-pruned.safetensors, Clip skip: 2, Version: v1.10.1 - Activate the parameters “Enable” and “Pixel Perfect”.
- For “Control Type,” select
Tile. - For “Preprocessor,” select
noneortile_resample. - For “Model.” Select
control_v11f1e_sd15_tilesince it is generated by SD1.5. - “Control Weight” at
1. Since this value is the intensity of the input image, If you lower the value, you will get a different image. Set it around 0.5 to 1.0. - “Ending Control Step” should also be set to
0.7. This value determines at what point the control net adaptation ends, so if this value is lowered, new elements will be written from there. This value should also be set around 0.5 to 1.0. - Leave the rest of the settings as default and press the “Generate” button to start generation.
- When you are satisfied with the results, send them to img2img using the 🖼️ button in the preview area.
-
After switching to img2img, rewrite the positive prompt as follows. Use the negative prompt as it is.
hyper detailed - Set “Sampling steps” to
30. - “Denoising strength” is a value that determines how close to the input image the image will be (0 means the input image, 0 means the input image). So, set it to
0.4. - Change “Resize to” to “Resize by” and set “Scale” to
2. - Under “Script” select
Ultimate SD upscale. If it is not listed, install 🔗Ultimate SD upscale. - Select “Upscaler” to your liking. In the example,
R-ESRGAN 4x+is used. - That’s all. Press the “Generate” button to start generating.
Tile sampling can now be used to write on existing images, and the SDXL model can be used to generate even more detailed illustrations.
Final result of Refinement of the generated image example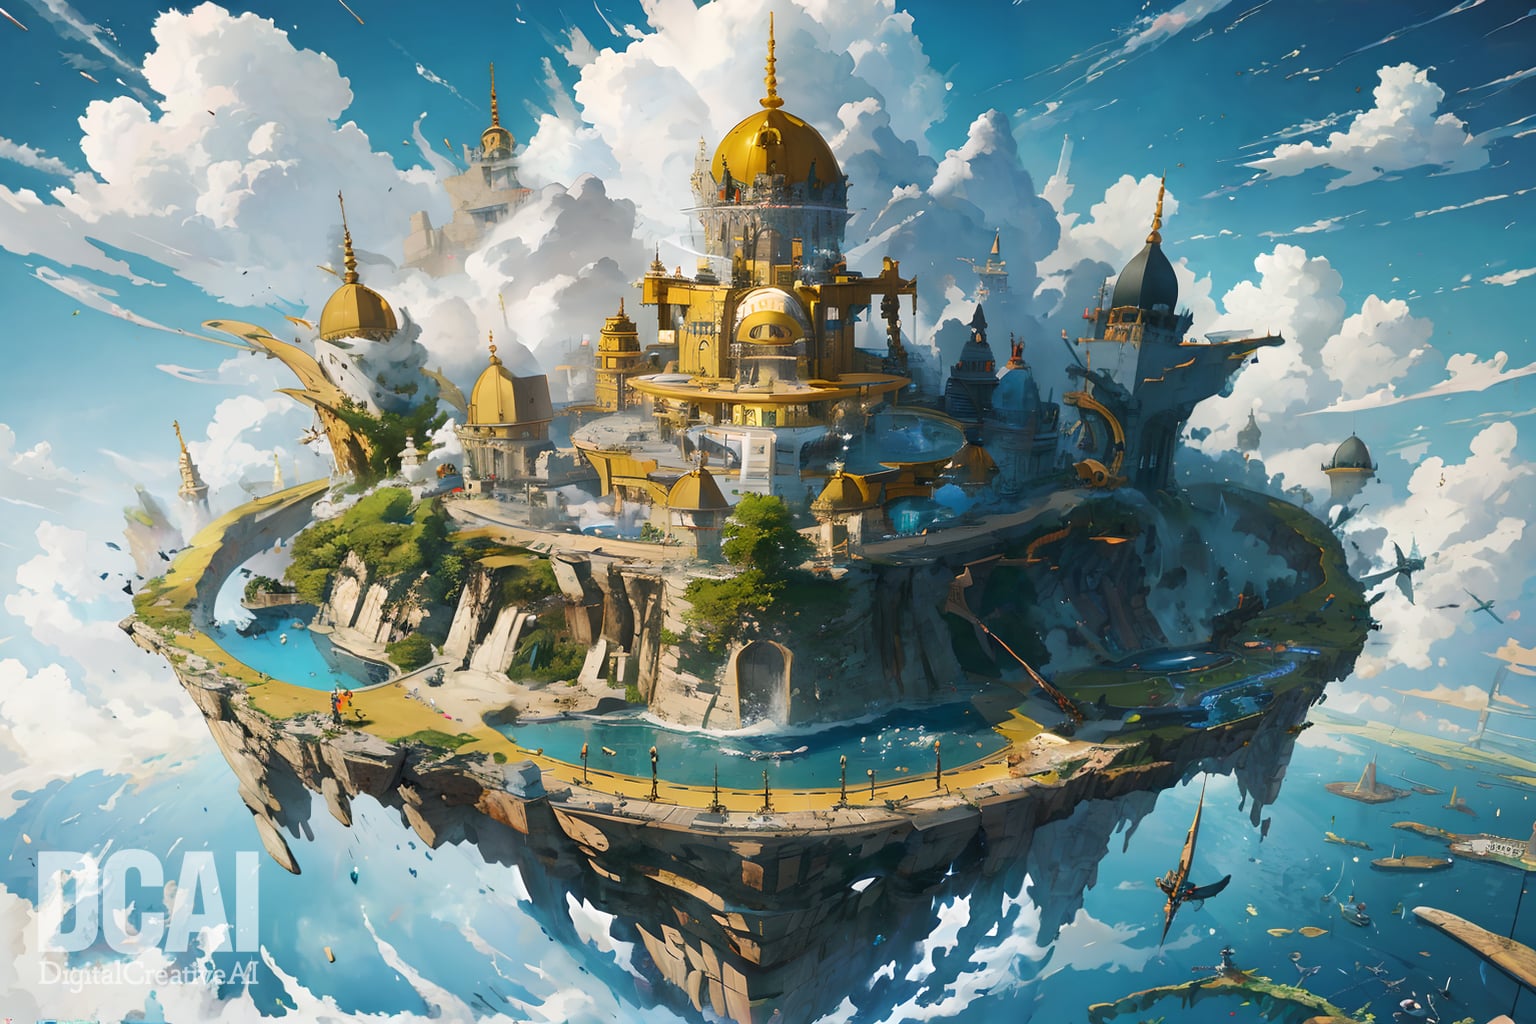
Conclusion
We have introduced a control net that adds various functions to the A1111 WebUI. Previously, there were only models for SD1.5, but SDXL models are coming out more and more. The much talked about Flux.1 control net is also available (usable with ComfyUI) and has become an indispensable extension for image generation. Next, I would like to introduce the control net in ComfyUI.
Thank you for reading to the end.
If you found this even a little helpful, please support by giving it a “Like”!