Basic usage of Stable Diffusion web UI (v1.9.0) Text-to-image section

Basics of Stable Diffusion
Stable Diffusion is an AI tool that generates high-quality images from text. Below is a simple explanation of its basic process.
- The user enters a brief text (prompt) description of the image to be generated.
- This prompt provides instructions for the AI to generate the image.
- First adds random noise to the image.
- This noise is then gradually removed to produce a prompt-based image.
- Starts with a rough image and gradually adds fine details.
- Through this process, an image is formed that matches the prompt.
- The generated images are reviewed by the user and adjustments are made as necessary.
- Changing the prompts can produce different results.
- Stable Diffusion has extensions to improve image quality.
- Tools such as LoRA and ControlNET can be used to generate even more detailed images.
Interface Description
Automatic1111’s Stable Diffusion web UI is designed to be easy to use, even for beginners.
Explanation of each area

About Checkpoint / Prompt Area

About Generation parameter Area

About Generate button Area

About Preview Area


When the preview image is displayed, the image metadata will appear at the bottom of the preview area.
Basic structure of prompts
Prompts are text that concisely and clearly communicate the characteristics of the images generated by the AI. It is important to give precise instructions to the AI using specific keywords and phrases.
e.g., Generating an image of a girl with black hairIf you want to generate an image of a dark-haired girl standing on a street, write the prompt as follows.
-
Danbooru style:
1girl, black_hair, standing, street, front_view -
Natural language style:
A girl with black hair standing on the street, viewed from the front.
Prompt Style Selection
There are two main styles of prompts.
- Danbooru style:List keywords (tags) separated by commas.
- Natural language style:Describe in a more natural sentence format.
These styles can also be combined. Depending on the combination of different words and phrases, the AI will generate a variety of images. Therefore, we recommend trying different prompts to find the best results.
Prompt Optimization
To write a good prompt, keep the following in mind
- Clarity: Clearly communicate the characteristics of the image you wish to generate.
- Simplicity: Omit unnecessary information and focus on necessary keywords.
- Variations: Try different styles and expressions and observe the AI’s response.
How to write negative prompts
The negative prompt is text describing characteristics of the image you do not want generated. Specify elements you do not want included in the generated image. The prompt style should be written in Danbooru style.
For example, if we generate the prompt introduced earlier with the negative prompt left blank, an unbalanced person may be generated. To avoid such generation, we will include prompts that we do not want to include in the negative prompt.
worst, ugry, deformed,The quality of the generation is improved by adding negative prompts such as “worst,” “ugly,” and “deformed.
About Sampling steps

In general, the higher the “Sampling steps” value, the higher the quality of the image, but increasing the value unnecessarily will increase the time required to generate the image. However, if you increase the value unnecessarily, it will increase the generation time. For reference, the image above shows almost no change when Steps: 30 and Steps: 70 are compared.
Generate around 25-45 until you get used to it.
About Sampling Methods and Noise Scheduling
Sampling Method
In the process of generating an image, Stable Diffusion initially produces a completely random image in the space of latent space (e.g., 512×512 dots). Then, predicted noise estimates the noise in that image, and the predicted noise is subtracted from the image. This process is repeated dozens of times until a clear image is produced.
This process of removing noise is referred to as sampling because Stable Diffusion generates a new sample image at each step. The method used for sampling is called a sampler or sampling technique.
Below is an example of a commonly used method/step combination.

- DPM++ 2M Karras: 20-30 steps
- UniPC: 20-30 steps

- DPM++ SDE Karras: 10-15 steps
- DDIM: 10-15 steps
The recommended settings are explained by the checkpoint models, so it is a good idea to refer to them.
About Schedule Type (Noise Schedule)

The “noise schedule” is a curve ratio where the noise reduction is increased step by step until the noise is finally reduced to zero.
Depending on the type of noise schedule, the attenuation curve from the highest noise amount in the first step to the zero noise state in the last step changes.
In version 1.9.0, you can now apply a schedule other than the default schedule. For beginners, selecting “Automatic” will automatically select the default schedule for the sampling method.
About CFG Scale

The “CFG Scale (classifier-free guidance scale)” is a value that adjusts how faithfully the image is generated to the prompt.
A large CFG Scale value produces an image that is close to a pronto, but if the value is too high, the image will be distorted. If the value is too small, the image will be rougher, but the image quality will improve. The value is determined by observing this balance.
It depends on the model and the style of image you want to generate, but until you get used to it, use a value between 5 and 9.
About Hires. Fix
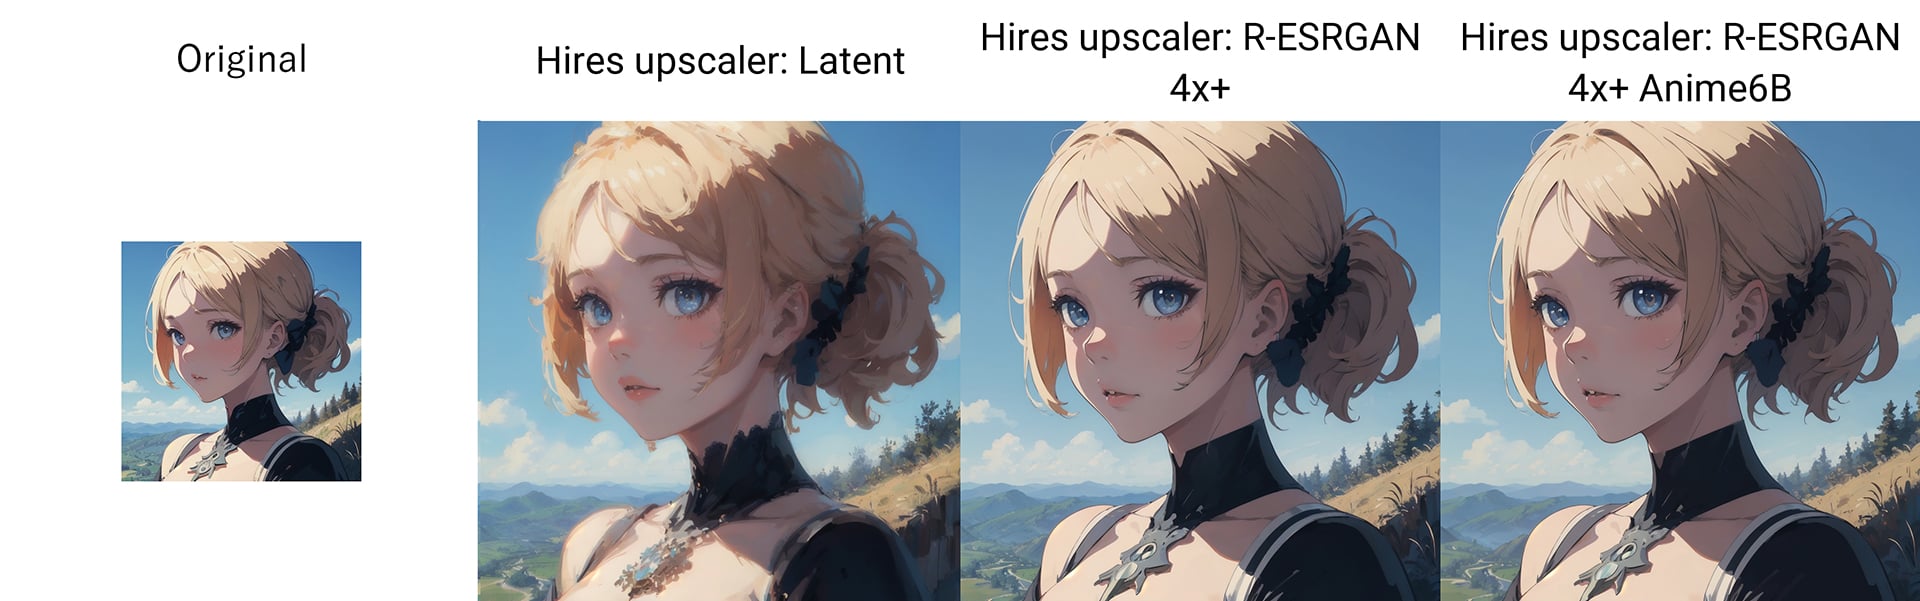
“Hires. Fix” will increase the resolution of the generated image while adding more details to the image. If the checkbox is checked, Hires. Fix will be applied to all generated images.

About Refiner

“Refiner” is a tool for fine-tuning images when generating SDXL models. Check the box if you wish to make further adjustments or improvements to the generated images.
To learn more about how to use the refiner in more detail, please refer to the following article.

About Clip Skip

“Clip Skip” is an indicator that sets how accurately the prompts you enter are reflected in the Stable Diffusion Web UI and can have values from 1 to 12. Specifically, it has the following characteristics
- For small values: Illustrations are generated as prompted.
- For large values: An illustration is generated ignoring the prompt.
Appropriate values for the clip skip setting vary from model to model. Refer to the download page for the model you wish to use and check the recommended Clip skip value. In general, starting with a Clip skip of 2 and changing the value to 1 if the prompt does not translate well to the image will increase the likelihood that it will work.
Difference between “Clip skip” and “CFG scale
Stable Diffusion also has a setting called “CFG scale” that specifies how much the prompt affects the image. clip skip and CFG scale are both settings that affect the prompt, but there is a fundamental difference.
Clip skip:- Settings to generate images based on differences in the interpretation stage of the prompt.
- The desired result can be selected from among the half-generated images.
- Usually use 1 or 2.
- A setting that gives all layers a certain level of understanding, but leaves the influence of the prompt to the AI.
- The interpretation of the prompts is left to the discretion of the AI to generate images.
By adjusting Clip skip and CFG scale, you can adjust the balance to produce the ideal image for the prompt. Adjust the settings to suit your own preferences and model.
How to activate Clip skip

“Clip skip” is not available in the initial installation of Stable Diffusion web UI. Please use the following method to enable it.
CLIP_stop_at_last_layers in the search box that appears and select the appropriate item from the search results.
CLIP_stop_at_last_layers
Image Generation
Based on the parameters you set, click the “Generate” button or Ctrl+Enter to start image generation. The generated image will be displayed in the preview area and can be saved.
Interrupt and skip generation
During generation, the button “Interrupt|Skip” allows the user to interrupt and skip the generation process.
- Generation interruption: Clicking on “Interrupt” will change it to “Interrupting…” and you can interrupt the generation by clicking on it again.
- Skip generation: Pressing this button when the “Batch count” of the generation is 2 or more terminates the current generation and moves on to the next batch.
Automatic Generation
Right-click the “Generate” button and select “Generate forver | Cancel Generate forver” to start automatic generation. Selecting “Generate forver” will start automatic generation. Selecting “Cancel Generate forver” during automatic generation will end automatic generation.
As you repeatedly generate images, a large number of images will accumulate in the “outputs” folder stable-diffusion-webui > outputs. (Click the 📂 button in the preview area to open the destination folder.) Don’t forget to manage this folder frequently.
Conclusion
This article details the basic steps for AI image generation using the text2img feature of the Stable Diffusion web UI. This guide will help you take your first steps into the world of AI-based image generation.
Stable Diffusion web UI is an intuitive and highly customizable tool that provides powerful support for users to realize their unique creative vision. text2img functionality allows users to transform text into visual art by imagination into reality.
We hope this guide will be helpful to your digital creativity.
Thank you for reading to the end.
If you found this even a little helpful, please support by giving it a “Like”!