Basic usage of ComfyUI (New GUI supported) Text to image section
- Jan 06, 2025 The new GUI of ComfyUI is supported.
In this article, we would like to explain the basic usage of ComfyUI. Let’s learn how to use it based on the default workflow. You can invoke the default workflow by clicking the “Load Default” button on the main menu.
Using the GUI
canvas

The empty space of the GUI is called the canvas.
graph

A series of blueprints with wire combinations of nodes
workflow

Overall project blueprint, data filed in Json format.

The ComfyUI menu is divided into three parts: Horizontal Bar, Sidebar, and Navigation Menu.
Horizontal Bar

The horizontal bar contains the main buttons for saving and recalling workflows and the Queue button. You can choose whether the bar is positioned at the top or bottom in the settings. 5 to 8 are not displayed if ComfyUI Manager is not installed.
- Workflow: Call up new workflows and templates, Save, load, and export.
- Edit: Undo/redo, node update, clear all workflows, and display copied images in the clip space.
- Help: There are links to ComfyUI issues, documentation, Discode, etc.
- Workflow Tab: The currently open workflows are lined up in a tabbed format.
- Manager: Open ComfyUI Manager.
- Unload Models: Unloads the currently loaded model.
- Free model and node cache: Releases cached models and nodes.
- Share: Share the currently open workflow by selecting it from multiple services.
- Queue: Add the current graph to Run or Queue. You can also change the Queue mode with the V button; Queue mode is explained later in this section.
- Batch Count: This is the number of graphs executed when the Queue button is pressed once.
- Cancel current run: Interrupts the currently running graph.
- Clear Pending Tasks: Deletes queued graphs.
- Toggle Bottom Panel: When you want to check the log, this button opens it.
- Hide Menu: Hides the menu.
Queue mode has three modes and is executed as follows
- Queue: Normal mode.
- Queue (Instant): Pressing the Queue button will keep it running forever. To stop, change the Queue mode to normal
Queue. - Queue (On change): It will automatically run when you change the node parameters. *If KSampler seed is randomized, it will continue to be executed.
In the old UI, it was able to be saved in any location, but in the new UI, it is saved in \ComfyUI_windows_portable\ComfyUI\user\default\workflows. If you want to save the workflow in an arbitrary location like in the old UI, use Export to save the workflow.
Sidebar

- Queue (q): Open the Queue list. You can check the current queue status and the generated images.
- Node Library (n): List of nodes. You can call a node with a click.
- Model Library (m): List of models. A node containing a model is called by clicking on it.
- Workflows (w): You can see the list of Workflows saved in ComfyUI.
- Toggle Theme: The UI can be switched between light and dark modes.
- Settings: Open the ComfyUI settings.

- Fill Image Preview: Toggles between full or enlarged view of the generated image.
- Show Flat List: Switch information on generated results between generation time only or output node, generation time, and hash code.
- Clear: Set the list to its initial state (blank).
- Preview: If you move your mouse over the generated image, you will see an eye button, which you can click to enlarge.
Other menu items such as delete, recall generated workflow, and move to output node appear when right-clicking on a generated image.
Navigation Menu

- Zoom In: Zoom in on the canvas.
- Zoom Out: Zoom out on the canvas.
- Fit View: Shrink the graph until the entire graph fits.
- Select Mode (Space)/Pan Mode (Space): Select Mode is the normal mode, and Pan Mode is the mode in which nodes are no longer touched and the canvas is moved by dragging.
- Toggle Link Visibility: Shows or hides wires.
Node
This section explains how to operate the node UI. The node menu, etc. may look difficult, but in reality it is not that difficult.
Adding Nodes

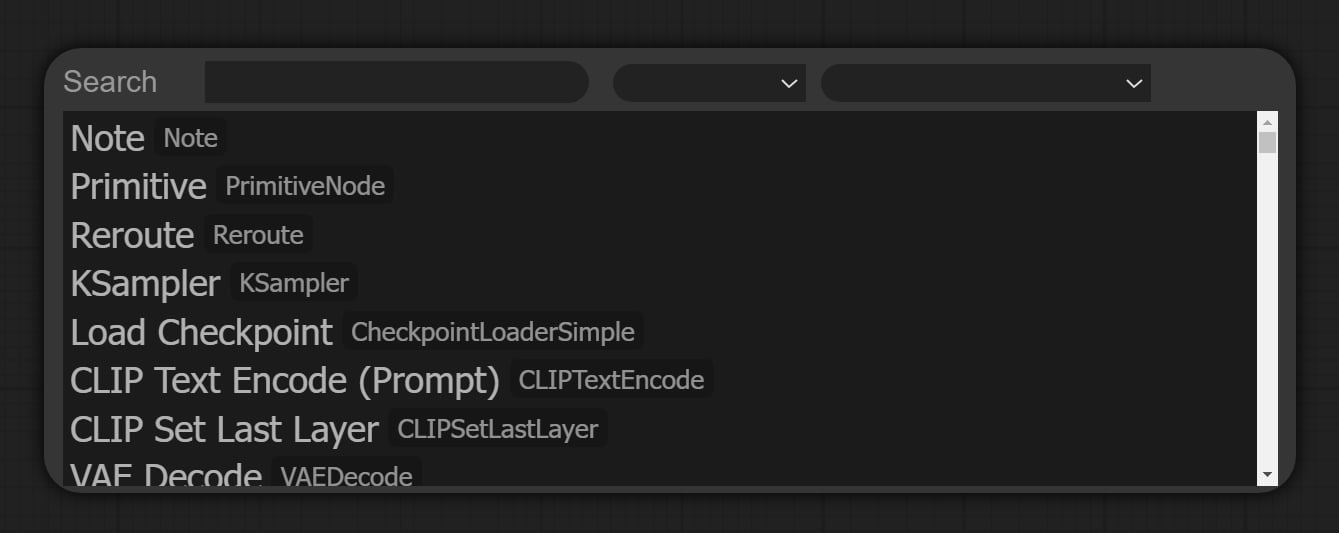
Right-click on the canvas and select Add Node > Node Type > Node from the menu that appears and select the desired node. You can also double left-click to open a quick search for a node.
Multiple Nodes Selection
Hold down Ctrl and drag or click to select the node you wish to select.
Moving multiple nodes
With multiple nodes selected, hold down the SHIFT button and drag to move them.
*The new UI allows you to move without pressing the SHIFT button.
Change the size of a node
If you move the mouse pointer to the lower right corner of the node you want to resize, the pointer will change and you can drag it to resize it.
Node Menu
Right-clicking on a node displays the node menu. The node menu varies slightly depending on the node selected, but we will use “Load Checkpoint” as an example to explain its basic usage.

- Node name for S&R: The S&R names for the node are displayed.
- Inputs: Usage unknown as it is disabled.
- Outputs: Usage unknown as it is disabled.
- Convert to Groupe Node: Convert multiple selected nodes into one node.
- Properties: Edit S&R name.
- Properties Panel: Opens the Properties panel.
- Title: Change the title of the node. You must press the OK button after making the change to apply it.
- Mode: Change the mode. Details are explained in the node mode.
- Resize: Restore the node to its original size.
- Collapse: You can minimize a node. You can also return a node to its original size by clicking on it while it is minimized.
- Pin: Fix the node. If you want to unfix it, click again.
- Colors: Change the color of the node. Select your desired color from the colors displayed.
- Shapes: Change the shape of the node. Select the desired shape from box, round, and card.
- Bypass: Bypass a node. Also use
Ctrl + bwith a node selected. - Copy (Clipspace): Copy the node parameters to Clipspace.
- Past (Clipspace): Paste the node parameters from Clipspace.
- Convert Widget to Input: If you want to manipulate the parameters from an external node, select param from here. For instance, if a parameter such as height is common to multiple nodes, a primitive node can be used for centralized management.
- Clone: Clone (duplicate) a node.
- Remove: Delete a node.
node mode
There are four node modes
- Always: It is always on in normal mode by default.
- On Event: Not implemented, so use unknown.
- Never: The flow stops at the Never mode node with the same action as Mute.
- On Trigger: It will be executed when the signal is received from onExcuted, although an error will occur because it is not yet implemented.
- Mute: The flow stops at the muted node.
- Bypass: The node is bypassed and the flow continues.
Group
Groups can be used to group nodes together. This is very useful and recommended.
- Create: Right-click on the canvas and select “Add Group”.
- Area Adjustment: Drag the lower right corner of the group to adjust the area.
- Add to Groups: Drag and drop the node you wish to add within the area of the group.
- Fit Group: Right-click on the group area and a menu will come up with “Fit Group To Nodes” to adjust the area automatically.
- Bypassing Groups: Click “Bypass Group Nodes” from the group menu to bypass the nodes in the area. To cancel, click on “Set Group Node to Always”.
- Editing: From the group’s menu, “Edit Group” allows you to change the title, color font size, and delete the group area (the nodes will remain).
Using the old GUI
Let’s take a look at how to use the old GUI (Graphic User Interface). If you want to use the old-style GUI, set Settings > Comfy > Menu to Disabled.
canvas (old GUI)

This section explains the basic usage of the main menu.
The main menu of ComfyUI is very simple and will be easy to use.

- :: : A handle to drag the main menu.
- Queue size: Number of graphs currently running and waiting.
- ⚙️: Open ComfyUI settings.
- Queue Prompt: Add the current graph to Run or Waiting Order.
- Save: Save the workflow as a Json file.
- Load: Load the workflow from a Json file or a PNG image generated by ConfyUI.
- Refresh: Update graphs.
- Clipspace: Displays the copied image in the clip space.
- Clear: Empty the graph.
- Load Default: Loads the default workflow.
- Reset View: Returns the canvas to its initial state.
Extra options

If the Extra options checkbox is enabled, a batch count can be specified. This is the number of graphs that will be executed when the Queue Prompt button is pressed once.
Auto Queue

Enabling the Auto Queue checkbox will automatically run the graph. This can be done in two modes as follows.
- instant: Pressing the Queue Prompt button will keep it running forever. To stop it, disable the Auto Queue checkbox.
- change: If you change the parameters of a node, it will automatically execute.
Queue Front

This button is used when multiple graphs are waiting in sequence and you want them to be executed first.
View Queue

The View Queue button allows you to check and manipulate the current queue status. You can also load parameters from the displayed queue by pressing the “Load” button and delete parameters from the queue by pressing the “Delete button”.
- Running: Currently running graph
- Pending: List of waiting graphs
- Clear Queue: Cancel all waiting graphs
- Refresh: Update the queue list
View History

The View History button allows you to view the history of the cue. You can also load parameters of the displayed cue by pressing the “Load” button and delete them from the history by pressing the “Delete” button.
- Clear History: Clear all history
- Refresh: Refresh history
Basic node structure
The node is a very important part of the “node-based GUI” as its name implies. However, the structure is very simple and easy to use.
Description of each area

- inputs: Valid inputs for the node are displayed.
- outputs: Valid outputs are displayed.
- parameters: This is the area for setting node parameters.
- Node ID Badge: They are numbered in the order they are called on the canvas. If you want to hide them, set Settings > Lite Graph > Node ID badge mode to
None.
Nodes basically have inputs, outputs, and parameters. Let’s assemble a graph by connecting the data from the outputs to the inputs using wires.
Types of Wires

There are different types of inputs and outputs, and different types cannot be connected.
- MODEL: Purple: Model data (Unet)
- CLIP: Yellow: CLIP model
- VAE: Red
- LATENT: Pink: latent space image
- CONDITIONING: Orange: Embeddings (prompt)
- IMAGE: Light blue: Pixel space image
If you want to make the wire straight, change “Link Render Mode” to Straight in the ComfyUI settings.
About changing parameters
To change the value of a parameter, enter the value and press OK or Enter to confirm. If you do not confirm the change, it will not be applied.
About node errors

If there is an error in the graph, the corresponding node is displayed in a red box. Correct the error. The error in the image is that the vae wire is not connected to the VAE Decode.
Shortcut List
| Key | Description |
|---|---|
| Ctrl + Enter | Add the current graph to Run or Waiting for Order |
| Ctrl + Shift + Enter | Prioritize the current graph |
| Ctrl + Z/Ctrl + Y | Cancel/Redo |
| Ctrl + S | Save the workflow |
| Ctrl + O | Load workflow |
| Ctrl + A | Select all nodes |
| Alt + C | Minimize/Undo selected nodes |
| Ctrl + M | Mute/Unmute the selected node |
| Ctrl + B | Bypass/unbypass selected nodes |
| Delete/Backspace | Delete the selected node |
| Ctrl + Backspace | Empty the canvas |
| Space + Mouse | Move the canvas with the mouse while pressing the space key |
| Ctrl/Shift + Click | Select multiple nodes |
| Ctrl + C/Ctrl + V | Copy and paste selected nodes (wire connections are ignored) |
| Ctrl + C/Ctrl + Shift + V | Copy and paste the selected node (the input is also carried over) |
| Shift + Drag | Move multiple selected nodes at once |
| Ctrl + D | Load the default workflow |
Alt + + | Zoom in on canvas |
Alt + - | Zoom out of canvas |
| Ctrl + Shift + LMB + Vertical drag | Zoom in/out on canvas |
| Q | Open the menu “View Queue”. |
| N | Open the menu “Node Library”. (New GUI only) |
| M | Open the menu “Model Librar”. (New GUI only) |
| W | Open the menu “Workflows”. (New GUI only) |
| H | Open the menu “View History”. (Old GUI only) |
| R | Update workflow |
| Double-Click LMB | Open a quick search for a node |
Description of each node of the default workflow

The default workflow, which is the minimum configuration for text to image, is explained here.
Load Checkpoint

Node to load a checkpoint model model. You can select a model from the list by clicking on “ckpt_name”. If there is no checkpoint model in the list, such as immediately after the model has been installed, you can refresh the list by clicking the “Refresh” button in the main menu.
The following article also provides recommended checkpoints.
![Featured image of [ Stable Diffusion web UI ] Introduction of SD1.5 Recommended Checkpoint Model](/_next/image?url=https%3A%2F%2Fdca.data-hub-center.com%2Fcontent%2Fuploads%2F2024%2F05%2Feyecatch-sd15-recommended-checkpoint-models-en.jpg&w=750&q=80)
![Featured image of [ Stable Diffusion web UI ] Introduction of SDXL1.0 Recommended Checkpoint Models](/_next/image?url=https%3A%2F%2Fdca.data-hub-center.com%2Fcontent%2Fuploads%2F2024%2F06%2Feye_catch_en_sdxl-recommended-checkpoint-models.jpg&w=750&q=80)
CLIP Text Encode (Prompt)

The CLIP Text Encode node encodes the CLIP model into a format that Unet can understand (embeddings). Both the upper and lower nodes are the same, but you can determine the difference between positive and negative where they lead to outputs.
Empty Latent Image

This node creates an empty potential space. Set the height and width, the batch size is the number of images to be generated in one Queue.
Batch size and batch count are similar but slightly different.
- Batch size: Set from Empty Latent Image node: Set the number of images to be generated at one time
- Batch Counts: Settings from main menu: Number of graphs to run in one Queue
For example, if the default workflow is executed with a batch size of 2 and a batch count of 3, a graph that generates 2 images will be executed 3 times for a total of 6 images.
KSampler

KSampler generates illustrations based on the input model, positive, negative, and latent images.
- seed: Seed for generation
- control_after_generate: Select the seed value from fixed, random, additive, or subtractive.
- steps: Sets the number of sampling steps.
- cfg: Sets how closely the image is generated to the prompt.
- sampler_name: Select the sampler type.
- scheduler: Select the type of noise schedule.
- denoise: The closer to 0, the closer the image is to the original. However, if there is no source image, as in this case, 1 is used.
Please refer to the detailed explanation regarding sampling, etc.

VAE Decode

The pixel space image is decoded using the VAE input to the latent space image. If the checkpoint model has a built-in VAE, there is no problem with this configuration, but if not, the “Load VAE” node must be used to load the VAE.
Also, to learn more about VAE, please refer to this article.
![Featured image of [ Stable Diffusion web UI ] Generate vivid images using VAE](/_next/image?url=https%3A%2F%2Fdca.data-hub-center.com%2Fcontent%2Fuploads%2F2024%2F05%2FeyeCatch-stable-diffusion-web-ui-use-vae-for-generating-clear-image-en.jpg&w=750&q=80)
Save Image

Saves the input pixel-space image with filename_prefix prepended to the filename. In this example, the file ComfyUI_00001_.png is generated.
The generated image is exported to the ComfyUI\output folder.
Prompts and workflows are also stored in the PNG metadata.
How to write prompts specific to ComfyUI
The writing of ConfyUI prompts is almost the same as for the A1111 SD WebUI, but there are some differences.
About Weights
Weights can be used in the same way as in A1111 SD WebUI, but the effect of the numerical values is different. Note that even with the same settings, the generated image will be different. Also, if you install these custom nodes “🔗Advanced CLIP Text Encode” or “🔗smZNodes” in ComfyUI, it will be possible to generate a close image.
The weight is described as (prompt:weight). For example, to emphasize the “red” in a red dress in a prompt such as a girl standing with red dress, you would write a girl standing with (red:1.2) dress.
About Negative Embedding
Negative embedding is described as embedding:name, where name is the name of the embedding file. For example, to use “EasyNegative.safetensors”, use embedding:EasyNegative. If you want to adjust the weight by weight, you should write something like (embedding:EasyNegative:1.2).
About Random Choice
Random Choice is like the A1111 SD WebUI extension “Dynamic Prompts”, which allows you to randomly select one of multiple prompts. For example, if you enter {smile|angry|cry}, 1girl in the prompt, it will use one of the three at random and randomly generate a girl with a smile, angry, or sad expression.
Improve the default workflow

At this point, you can now generate various things by touching prompts, Steps, etc. However, the quality of this default workflow is not that good. So, to get used to ComfyUI, let’s improve the quality of the workflow.
Adapt Clip skip

The ClipSkip configuration node is not adapted in the default workflow; if you are generating AI illustrations, you should adapt clip skip as it is often used.
- From Add Node, create conditioning > CLIP Set Last Layer.
- Connect the CLIP output of Load Checkpoint to the input of CLIP Set Last Layer.
- Connect the output to both positive and negative prompts.
- If you want A1111WebUI to be the same as the Clip skip2 setting, set the value of “stop_at_clip_layer” to
-2.
Adapt LoRA

To adapt LoRA in ComfyUI, use the “Load LoRA” node. In this case, we will adapt “add_detail” which will add details. Let’s place the model at ComfyUI\models\lora. Please refer to the following article for more information about LoRA models.


- From Add Node, create loaders > Load LoRA.
- Connect the MODEL output of Load Checkpoint to the model input of Load LoRA.
- Connect the CLIP output of CLIP Set Last Layer to the clip input of Load LoRA.
- Connect the MODEL output to the KSampler model.
- Connect the CLIP output to both positive and negative prompts.
- Select the model you wish to use for lora_name.
- strangth_model is the same LoRA weight value as A1111 in its influence on the model.
- strangth_model is the influence on the clip (prompt). Basically, it is used in 1.
If you want to adapt multiple LoRAs, you can do so by chaining several Load LoRAs together. If you use custom nodes, such as the Lora Loader Stack from “rgthree’s ComfyUI Nodes,” you can adapt multiple LoRAs with a single node. Please refer to the following link for more information on how to use custom nodes.
![Featured image of [AI Illustration] Introduction of Recommended Custom Nodes for ComfyUI](/_next/image?url=https%3A%2F%2Fdca.data-hub-center.com%2Fcontent%2Fuploads%2F2024%2F08%2Feye_catch_comfyui-recommended-custom-nodes_en.jpg&w=750&q=80)
Adapt Hires. Fix (simplified version)

Hires. Fix is a simplified version and does not use an upscaled model, but it introduces a process to add details based on the upscaled Latent.
- From Add Node, create latent > Upscale Latent By.
- Connect the out of KSampler to the input of the Upscale Latent By created earlier.
- Set upscale_method in Upscale Latent By to nearest-exact and scale_by to 2.00.
- Clone or create a KSampler from Add Node > sampling > KSamper and connect model/positive/negative respectively. (Same as the first KSampler)
- Connect the out of Upscale Latent By to the latent_image of the KSampler you just created.
-
Set the parameters of KSampler (2nd time) as follows
steps: 35 cfg: 10.0 sampler_name: euler_ancestral scheduler: karras denoise: 0.55 - Add Node than_for_testing > VAE Decode (Tiled) and set tile_size to 512.
- Connect the out of VAE Decode (Tiled) to the original Save Image.
- Right-click and drag from the VAE Decode out after the first KSampler to the canvas. When you release the drag, you will see a list of nodes that can be adapted and select PreviewImage.
Make KSampler's Seed common (optional)

This process is useful when you want to generate the same illustration later using seed, so you do not have to include it if you do not need it.
- Right-click on KSampler (1st time) to bring up the node menu.
- Select Convert Widget to Input > Convert seed to input from the node menu so that the seed is connected to an external node.
- From Add Node, create utils > Primitive and connect the out to the Seed input of KSampler as described above.
- For KSampler (second time), create a seed input in the same way and connect the Primitive out from the previous step.
Now the seed value of each KSampler can be managed in the Primitive node.
This completes the improvement of the default workflow, and I have placed the workflow in DCAI’s Patrion for your reference if it did not work.
Conclusion
In this article, we explained the basics of ComfyUI through the default workflow, which may seem complicated compared to A1111 SD WebUI, but stay tuned for more articles about ComfyUI.
Thank you for reading to the end.
If you found this even a little helpful, please support by giving it a “Like”!